
Energy project construction, improve the project landing program, to achieve perfect delivery.
In recent years, the real estate market to implement hardcover repair projects developed rapidly, with the diversification of the contracting industry, the construction units can provide more and more extensive demand for services, not limited to the construction according to the drawing, drawings of the deepening design has become the conditions of the tender offer gradually become a convention, can make the construction of the project to meet the provisions of the construction design more optimized.
Through the whole process of drawings deepening, to achieve project excellence, improve the project standardization, fine management level, improve customer satisfaction, to achieve word-of-mouth transmission.
Hardcover repair construction deepens the landing process
01
The project starts
Drawing review
1, the full drawings will be triage
2, drawing material integrity
3, site survey
4, the work interface division
5, professional norms review
The deeper list
1, drawing answer list
2, the program deepening list
3, node drill-down inventory
4,1:1 sample list
5, BILL
02
The initial phase of the project
Grass-roots, closing deepening
1, budget management guidance to the bottom
2, partition drawing practices discussed
3, the grass-roots approach to the bottom
The cable control
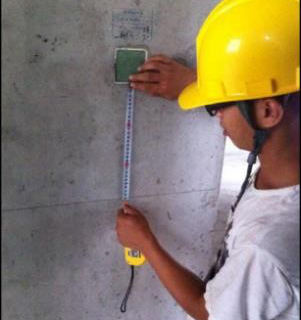
1, building rough size feedback
2, deepen the design drawing complete drawing
3, the scene put the finished surface drawings
03
The mid-phase of the project
The composite cloth point plot is drawn
1, the plane comprehensive cloth point drawing
2, the top surface comprehensive cloth point drawing
3, equipment opening size
4, professional will sign
Hardware configuration table
1, unified common door size, and wood finish manufacturers to deepen the confirmation of hardware matching ratio
2, with fire door manufacturers docking, clear all types of fire door location
04
The closing phase of the project
The composite cloth point plot is drawn
1, the interpretation and composition of the full control diagram
2, full profile: single-line double-line
3, the full section extension face: operation deduction
4, the full exhibition
Design changes
1, design change initiator thinking angle
2, keep the change information in sync
3, do a good job of written confirmation
4, design change archive, cross-docking
05
The completion phase of the project
Dynamic drawing adjustments
Real-time adjustment of change drawings to the general drawing, so that with the site construction synchronization.
Deepen the transfer
Start handing over deeper design work or acting as a partition administrator.
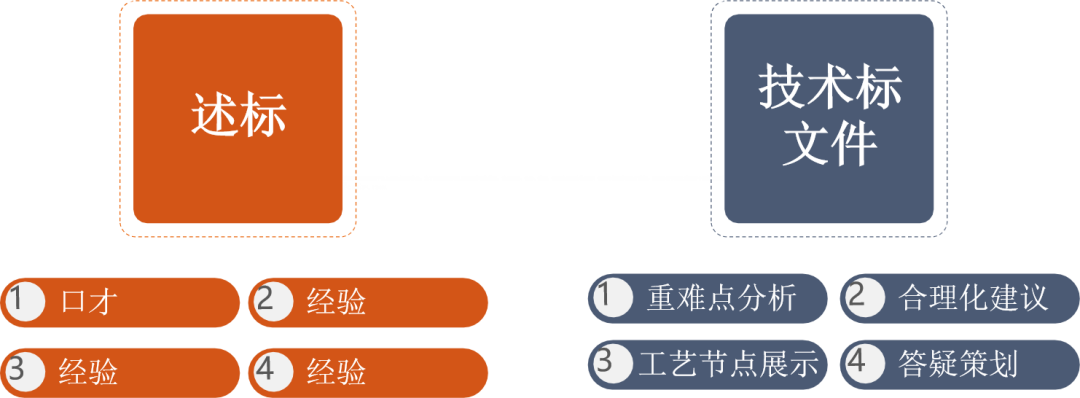
The embodiment of the value of deepening
01
Bid match
Deepening the designer through the decoration of the tender drawing and construction drawing of the drawing difference combing, design doubt, process practices and process optimization, so that the construction drawing after the deepening design has implementability, at the same time for cost control to provide dynamic adjustment programs for the process management to provide ideas.
02
Project management
Add and subtract according to different forms of contract. Be sure to make adjustments within Party A’s price limit.

03
Drawings deepen
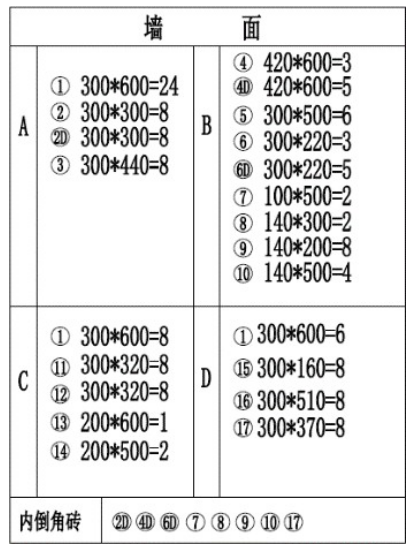
Deepen the summary of design output drawings
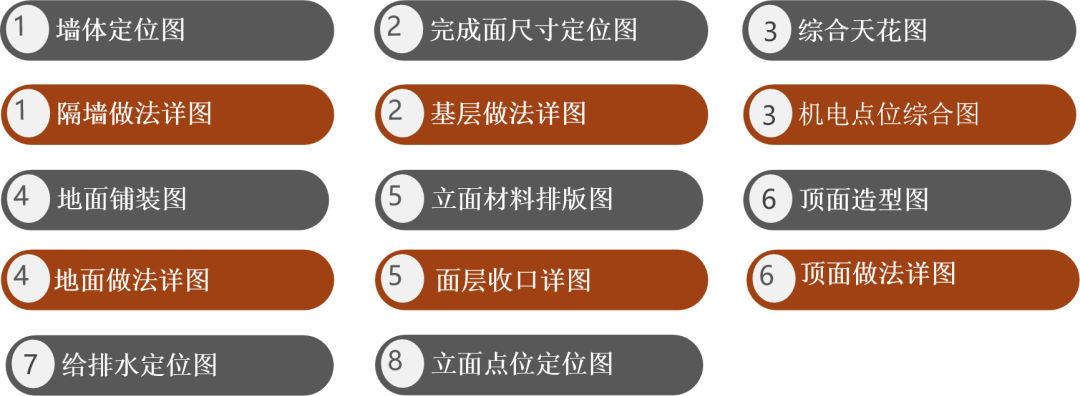
04
Integration of as-built drawings
The completion chart grid

Specific deepening case guidance
01
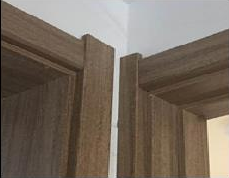
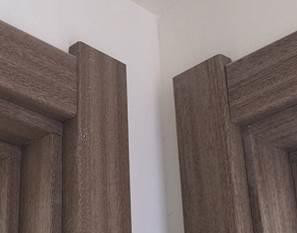
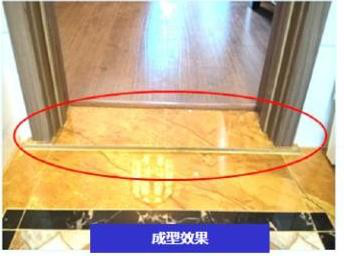
Indoor wooden doors stacking deepening
Civil construction without reserved door stack / civil reserved door stack
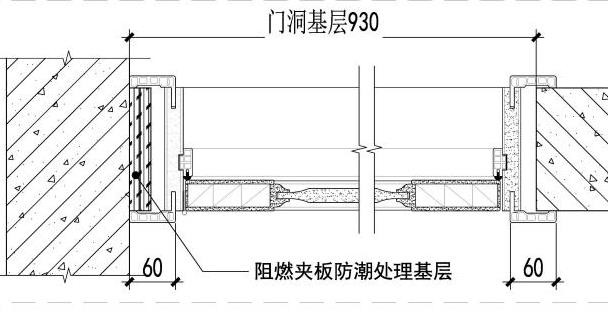
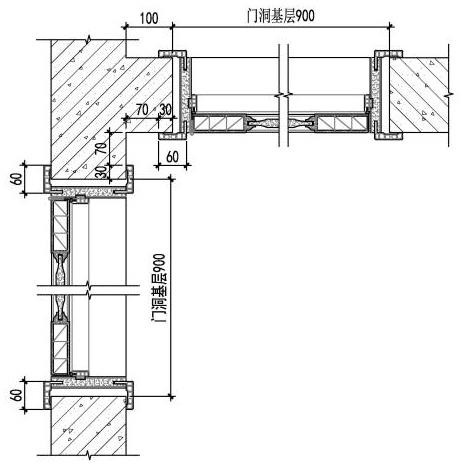
Click to see the larger picture
Deepen the standard
(1) One-sided doorless stacking situation: the net width of the door hole is 30mm;
(2) No door stacking on either side: the net width of the door hole is 60mm;
(3) The above-mentioned door stack reserved dimensions are determined by 60mm door cover, the remaining dimensions of the door cover line, the door stack width is reserved according to the actual, indoor door stacking needs to be reserved for at least 30mmfinishsurface.
Quality control
(1) The verticality and flatness of the walls on both sides of the door stack meet the requirements;
(2) The thickness of the door pallet shall be considered according to the three conditions of no smudge / thin plaster / plaster;
(3) The same area door cover installation is highly consistent.
Forming effect (door sleeve complete, highly consistent)
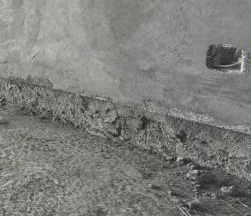
Wrong practices . . . the right practices . .
02
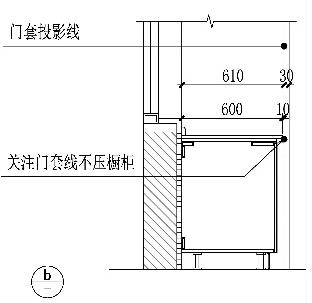
The relationship between table stone and door cover is deepened
The relationship between the countertop and the door cover is correct

Click to see the larger picture
Deepen the standard
(1) Kitchen / bathroom countertops to avoid conflict with door covers;
(2) If the width of the kitchen / bathroom wall stack is the whole brick module, if 550mm deep countertop, the width of the wall stacking plasterer is 610to620mm; ≥660;
(3) When the two sides of the bathroom cabinet are walls, the reserved width (wall brick finish surface) between the walls is 10mmlarger than the bathroom countersurface;
(4) The normal plaster wall on both sides is clear: the width of the countertop is 10mm and 40mm
(5) Thin plaster wall on both sides clears the air: the width of the countertop is 10mm and 40mm paste is smeared with 10mm
(6) The walls are cleared on both sides without smudge: the width of the countertop is 10mm and 40mm.
Quality control
(1) Table basin cabinet orders before tiles should be laid to complete, accurate dimensional measurement;
(2) Tiles are plastered with Yin and Yang angle square positiveness, flatness in line with the requirements.
03
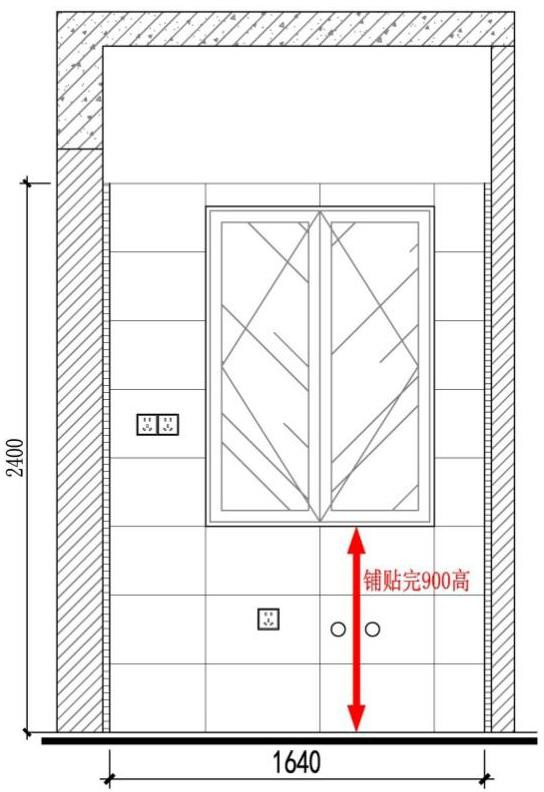
Kitchen, bathroom window bottom elevation deepening
Kitchen schematic / bathroom diagram

Click to see the larger picture
Deepen the standard
(1) Window sill height: after the finish of the paving label height of .900mm(aluminum mold and wall plaster deepening platform entrance height of .880mm),to ensure that 3 bricks of the whole tile , the bathroom shower area kicks and feet with the shower area floor brick material;
(2) Tile layout and door and window holes vertical seam, window hole width tile layout is divided, to ensure that the whole brick paving on the stitching neat and beautiful.
Quality control
(1) Gap width 1.0to1.5mm,the use of cross card control brickseams, brick seams should be after the paving layer is dry and before the installation of the four pieces of seam, the use of special sewing agent.
04
Renovation complete face height relationship general illustration
The elevation completion face height relationship is shown in the general illustration
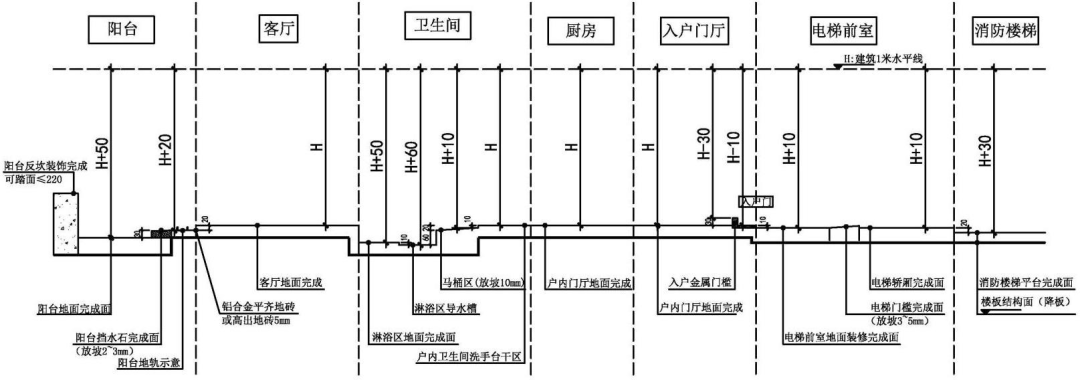
Click to see the larger picture
Deepen the standard
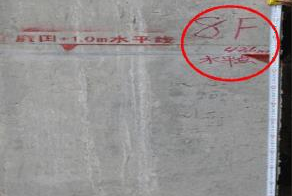
(1) To build a one-meter line as the baseline;
(2) Each functional area is decorated into a live line elevation determined;
(3) The recommended elevation is as shown above.
Quality control
(1) The Technical Department reviews the calibration scheme logic;
(2) The standard layer structure stage is completed with face line, project review.
Note: The elevation requirements vary from region to region, please draw the elevation diagram according to the actual situation of each project.
05
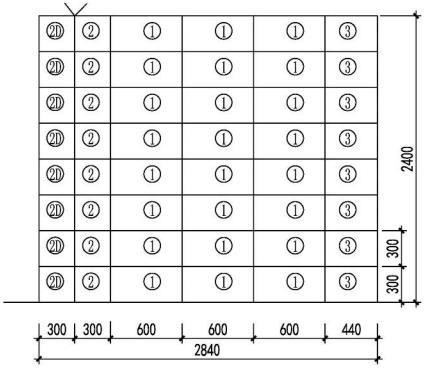
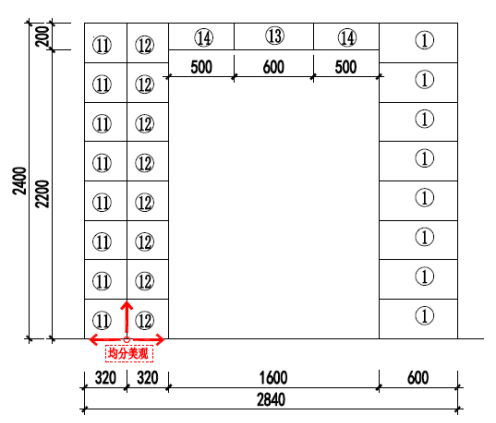
Kitchen wall tile layout deepens
The order in which the bricks are laid
Click to see the larger picture
Facade materials deepen the processing diagram
Click to see the larger picture
Façade material summary
Deepen the standard
(1) Complete the positioning of the wall line according to the comprehensive diagram;
(2) Walls are prohibited from appearing smaller than 100mm bricks;
(3) The vertical layout of the wall tiles is 8 or 9 bricks;
(4) Non-whole brick as far as possible reserved for the door, cabinet corner position;
(5) Focus on the wall brick starting point and laying order (reduce the “7” brick, convenient centralized processing), civil structure stage to optimize the size of the outer window hole, matching the number of wall bricks.
Quality control
(1) The wall tiles are layered and the first tile is paved from the second brick on the ground. Wall brick pressure floor tiles, the ground no seams;
(2) Switch Panel cut hole Edge distance tile edge >20mm,to prevent the later appearance of panel cross-seam situation.
06
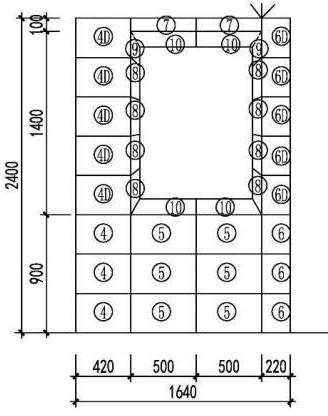
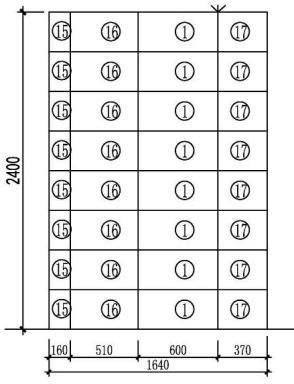
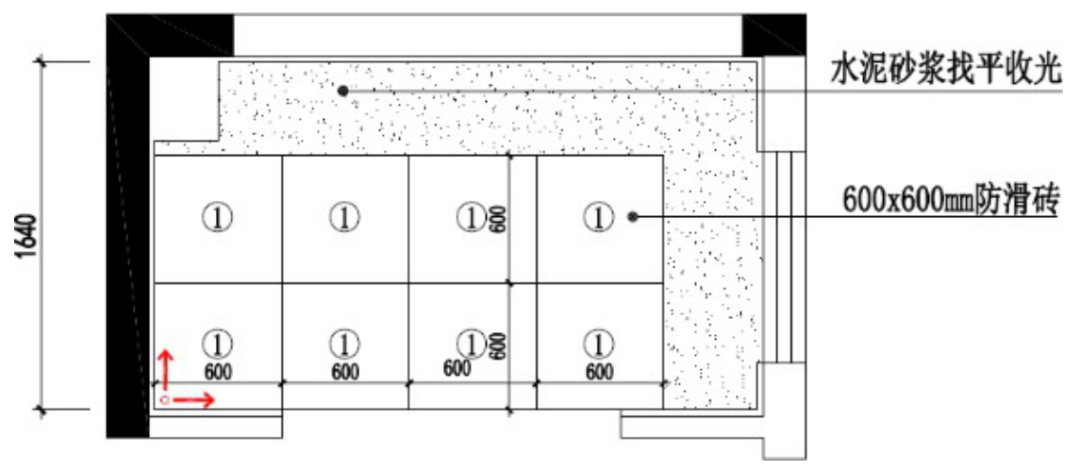
Kitchen floor tile layout deepens
Ground materials deepening processing diagrams
Click to see the larger picture
Deepen the standard
(1) The kitchen finish is level on the living room finish surface;
(2) Indoor tile crevice width 1.5 to 2mm,Yang terrace tile seam 3 to 5mm.
Quality control
(1) the use of cross card control brick seams, brick seams should be 4 days later and before the installation of the four pieces of back seam, the use of special sewing agent, after the use of special tools for sewing, smooth light slip, finished product protection perfect;
(2) Cabinet bottom mortar flat layer (must be collected) out of the wall should be ≤ 480mm,looking out for slope.
07
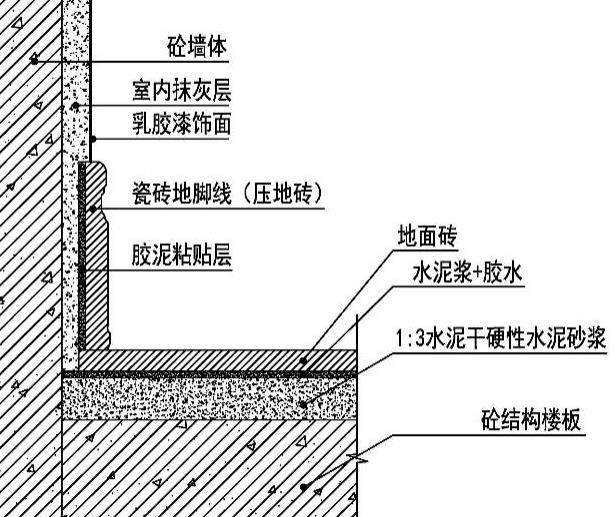
Kick line paving is deep
Kicking line paving to deepen the big picture
Click to see the larger picture
Deepen the standard
Kick line position plaster layer should be reserved (ordinary plaster reserve thickness 20mm,no smudge / thin plaster system reserved enterprise mouth depth 5-8mm),kick line paving should be pressed tiles, no seams facing the sky.
The molding effect
Civil reserved grooves are semi-implicit
08
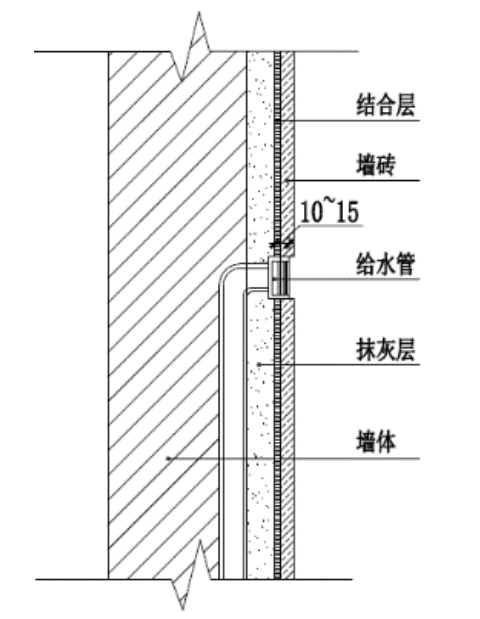
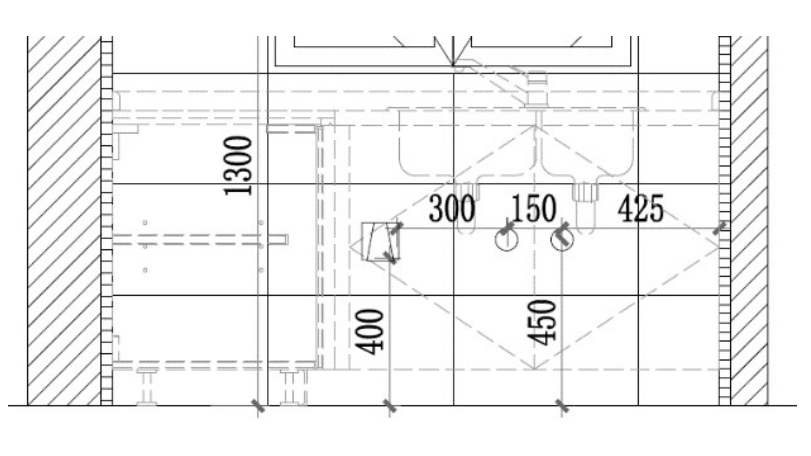
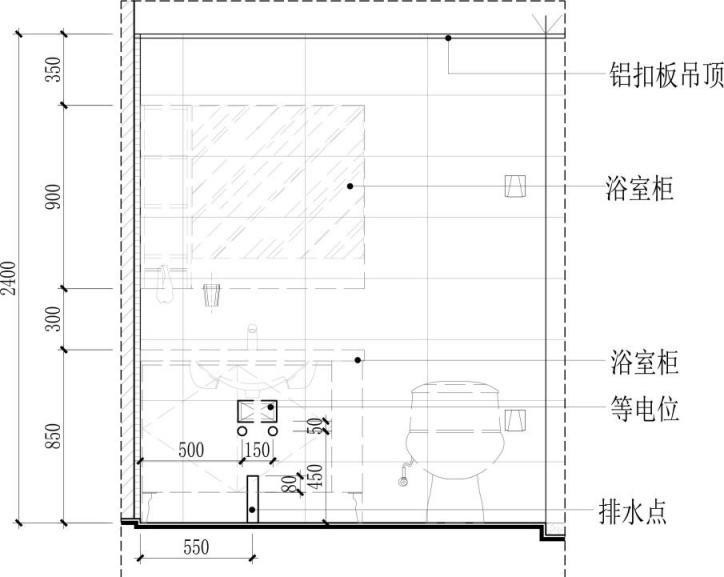
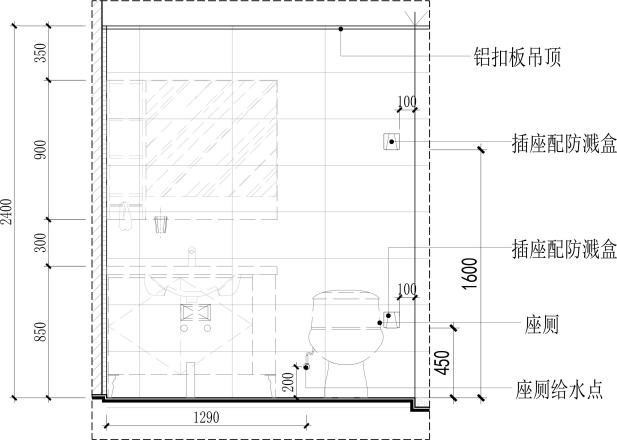
Kitchen sink water and water point deepening
Washing pot water and electricity dot bit deepening figure
Click to see the larger picture
Deepen the standard
(1) socket, water mouth does not cross brick seams, from the tile edge ≥ 20mm;
(2) Washing basin cabinet body socket should be equipped with splash-proof surface cover, to the water outlet pipe head out of the wall gray (aluminum mold concrete smudge-free / thin wipe surface)10 to 13mm, water outlet from the socket ≥ 300mm.
Quality control
(1) line positioning, clear wall tiles, accurate positioning of hydropower;
(2) Consider the thickness of the wall dusting and the thickness of the tiles.
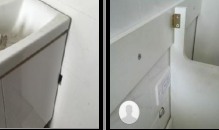
Forming effect (door sleeve complete, highly consistent)
Wrong practices . . . the right practices . .
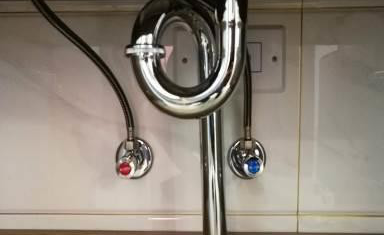
09
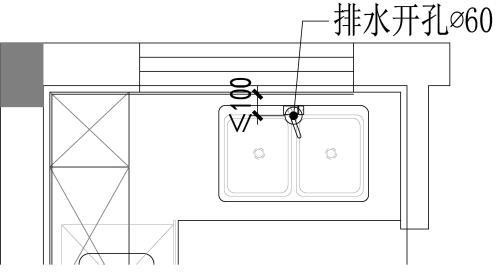
The drainage point of the kitchen sink is deepened
Chart of the openings of the cabinet floor
Click to see the larger picture

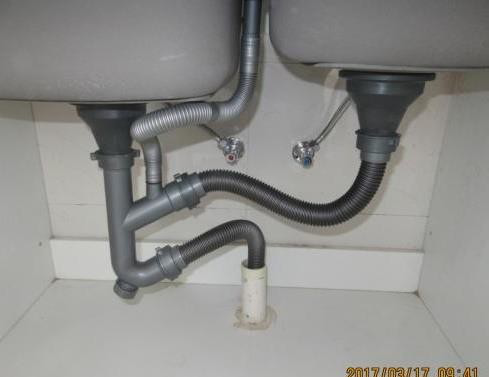
Wrong practices . . . the right practices . .
Deepen the standard
(1) Washing basin hot and cold water pipe installation completed, in the same cabinet body, not with the cabinet partition, wash basin conflict; Draining cross pipe installed under the cabinet bottom plate, vertical pipe higher than the cabinet bottom plate 50mm to 80mm,from the cabinet backboard ≤ 100mm.
Quality control
(1) The three-way height of the drainage rise pipe conforms to the height of the drainage cross pipe;
(2) Deepen the relationship between the tap and the window opening fan position, and solve the problem of the conflict between the opening and tap in the sash.
10
Bathroom threshold brick patch node deepening large sample map
The threshold brick and shower screen are high
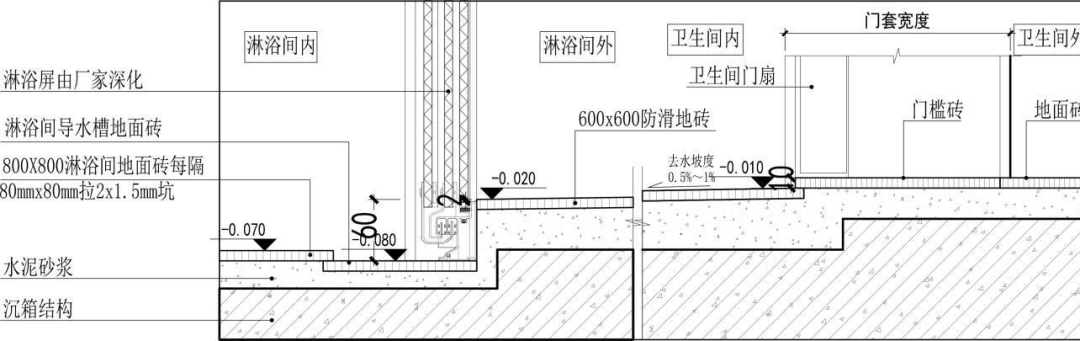
Click to see the larger picture
Deepen the standard
(1) Bathroom threshold brick using wet paving paste, threshold brick on both sides stuffed dense;
(2) The door is the whole brick starting point , the live brick is placed at the bottom of the bathroom cabinet , the dry area is paved with the finish surface drops 10mm, andthe threshold brick at the wet and dry boundary increases the ears L40 x W30mm, door cover mounting on the threshold brick.
Quality control
(1) Shower screen location to consider the presence of back beams on the lower floor panels.
The molding effect
11
Toilet and other potential points
Toilet and other potential point façade positioning map
Click to see the larger picture
Deepen the standard
(1) The back box positioning reservation should be no conflict with the cabinet body, center or one-sided pre-buried;
(2) Back box out of the wall graying surface (aluminum mold concrete smudge -free / thin wipe surface)10to15mm.
Quality control
(1) Pre-buried and other potential back box flat;
(2) Welding method galvanized round steel double-sided welding 6D,flat steelthree-sided welding;
(3) The toilet socket PE line must be connected to the isoelectric box;
(4) Resistance testing meets the requirements.
Forming effect (door sleeve complete, highly consistent)
Wrong practices . . . the right practices . .
12
The toilet water point is deepened
Toilet water point location map
Click to see the larger picture
Deepen the standard
(1) The water outlet does not cross the brick seam and is 20mmfrom the tile edge≥;
(2) To the water mouth pipe head out of the wall gray surface (aluminum mold concrete smudge-free / thin wipe surface)10to15mm, the water supply port from the socket ≥ 300mm,the corner valve position does not exceed the outside of the water tank 100mm。
Quality control
(1) Tile openings should be made with special openings, the aperture should be 30-35mm;
13
The toilet drain hole is deeper
Position of the toilet drain plane
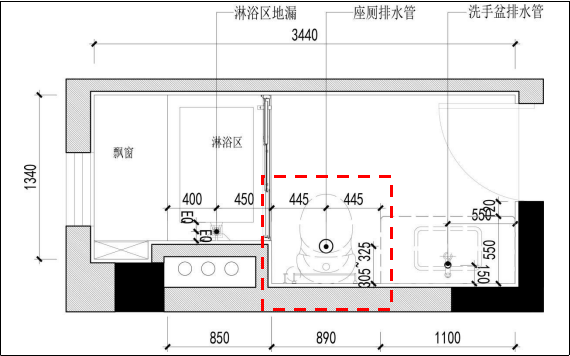
Click to see the larger picture
Deepen the standard
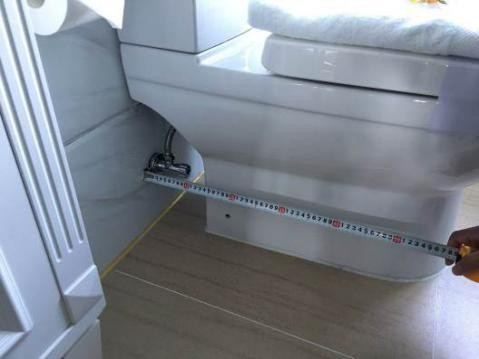
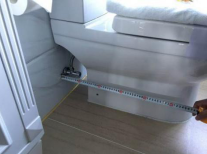
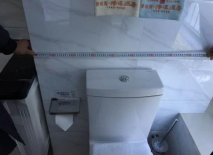
After the installation of the toilet water tank from the wall gap ≤ 20mm,the toilet use space ≥ 800mm.
Quality control
Control drainage hole center, toilet sewage outlet higher than the ground completion surface ≥ 8mm.
Forming effect (door sleeve complete, highly consistent)
14
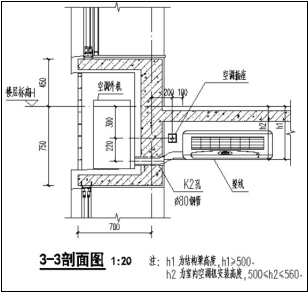
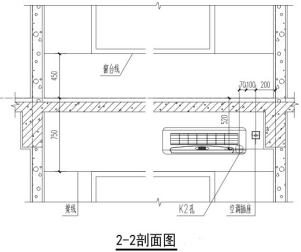
Air conditioning holes and socket position deepening (hanging air conditioning)
The air conditioning holes and sockets are illustrated on the left and right sides of the yin
Click to see the larger picture
Air conditioning holes and sockets are on the same façade diagram
Click to see the larger picture
Deepen the standard
(1) Air conditioning holes and sockets are on the upper and lower sides of the yin and angle, air conditioning sockets than air conditioning holes high, hole center and socket center up and down distance of 220mm, upper and lower double gypsum line air conditioning holes to avoid the lower gypsum line.
(2) Air conditioning holes and sockets are on the same elevation, and are installed at the top of the window, air conditioning socket center than air conditioning hole height of 120mm,air conditioning hole center and socket center left and right distance of 170mm, up and down double gypsum line condition air conditioning hole to avoid the lower gypsum line.
(3) Hanging air conditioning should reasonably consider the linear height of the gypsum line (including the waistline) to avoid conflict.
Quality control
(1) Air conditioning holes in advance to do a good job of pre-buried aperture of s80,the hole inside the high and outer low, slope is greater than 5%,to prevent rain water pouring, cover using closed air conditioning hole cover;
(2) Push the positioning upside down when the structure is pre-buried.
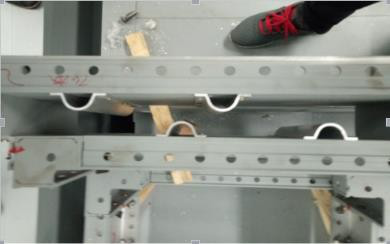
15
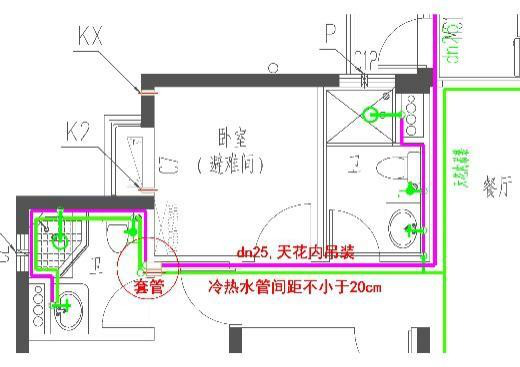
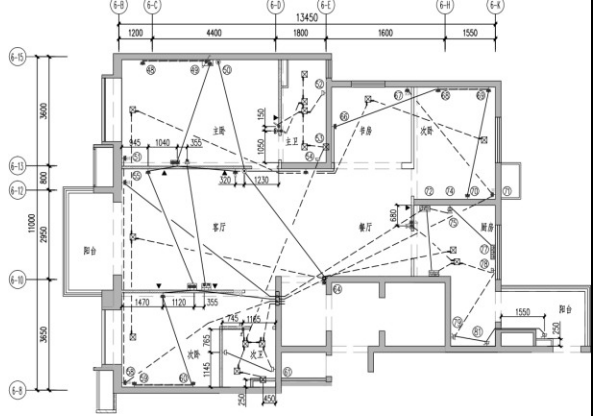
The pipe walks the smallpox arrangement deepens
Smallpox inner ming installed pipe design / shear force wall flow pipe groove large sample
Click to see the larger picture
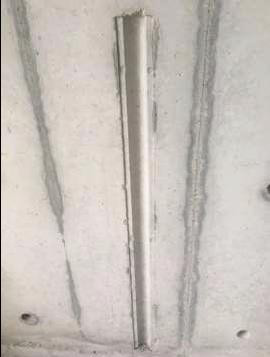
Shear wall water pipe pressure groove molding effect
Click to see the larger picture
Bathroom back-bump groove
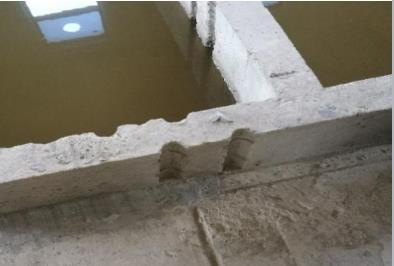
Click to see the larger picture
Deepen the standard
(1) When the water pipe is arranged up and down the smallpox, make sure that the hot water pipe is on and the cold water pipe is on the bottom;
(2) Hot and cold water pipe arrangement spacing is not less than 20cm,do not meet the spacing requirements of the case hot water pipe should take insulation treatment;
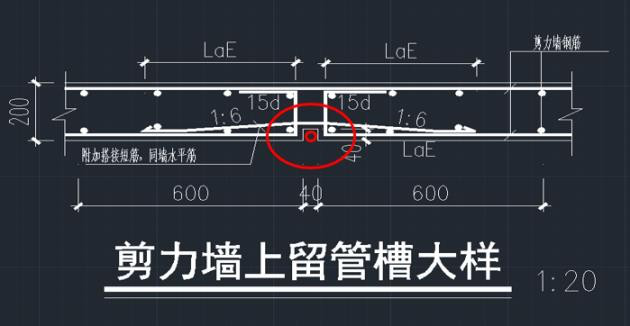
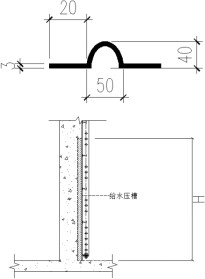
(3) When the water pipe is arranged vertically in the concrete wall, the wall should be treated with hard material, the outer diameter of the notch is 50mm,the depth is 40mm,and the thickness of the plate is 3mm;
(4) Balcony and other reinforced areas should be used under the design institute under the department of large sample map for pressure tank treatment.
Quality control
(1) The casing should be reserved in advance when the pipe is arranged through the wall;
(2) The fitting is not allowed to be installed in the casing;
(3) Hot and cold water pipes are not allowed to share wall casings;
(4) to the bathroom shower rain shower should pay attention to the hot water pipe on the left side of the cold water pipe, spacing 15cm, it is appropriate to use the finished silk elbow;
(5) Bathroom back-bump inside and outside the water pipe pressure tank position should be staggered arrangement, water pipe is strictly prohibited directly from the anti-Kangen perforated through.
Forming effect (door sleeve complete, highly consistent)
16
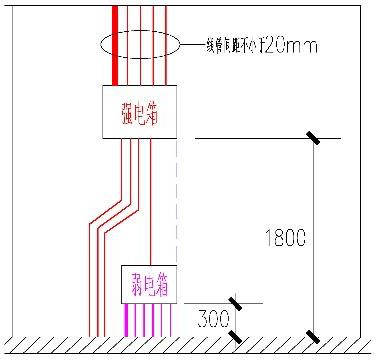
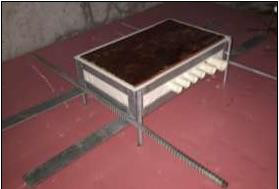
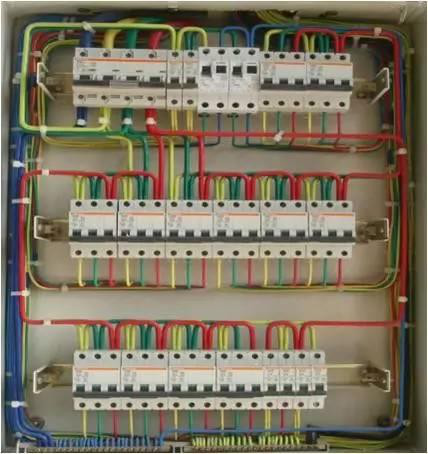
The layout of the strong and weak electric box is deepened
Strong and weak electric box arrangement
Click to see the larger picture
Deepen the standard
(1) According to the design drawings to calculate the strength of the electric box each has several wire tube introduction and introduction, outdoor strong and weak wire cable into the household cable tube installed on the far left side of the box, out of line in order to the right side of the pipe;
(2) the bottom margin of the household power distribution box box is 1.80 meters, and the bottom margin of the weak electric box is 0.30 meters;
(3) The strong electric box leads a PVC20 wire tube to the weak electric box, and the pipe wearing wire specification is BV-3×2.5,which supplies power to the equipment in the weak electric box.
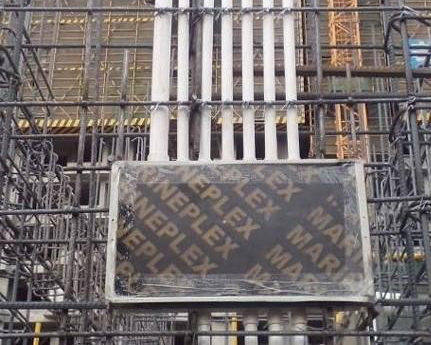
Quality control
(1) The electric box box in the shear wall should do a good job of reinforcement measures in advance to prevent the deformation of the box after pouring concrete, and the pre-buried box body in the distribution box structure should not deform more than 5mm;
(2) Pre-buried box back to do a good job of positioning the rib support, to prevent the electric box release;
(3) The distance between the leading box wire pipes shall be guaranteed not less than 20mm, so as to prevent the denseness of the lines from leading to unclosed concrete pouring;
(4) Strong and weak power box height in strict accordance with the design drawing requirements for installation, positioning to ensure that the box has one side vertical alignment.
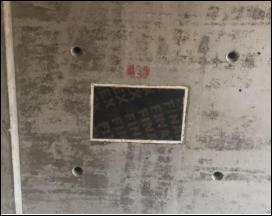
Forming effect (door sleeve complete, highly consistent)
17
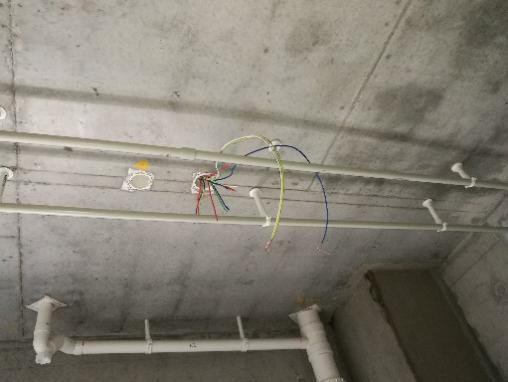
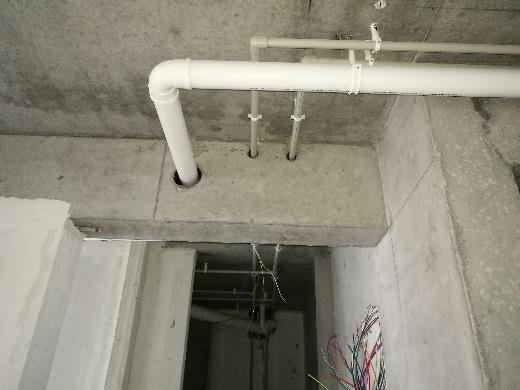
Indoor lighting, socket and pipeline positioning
Lighting deepening diagram / strong and weak electrical socket deepening chart
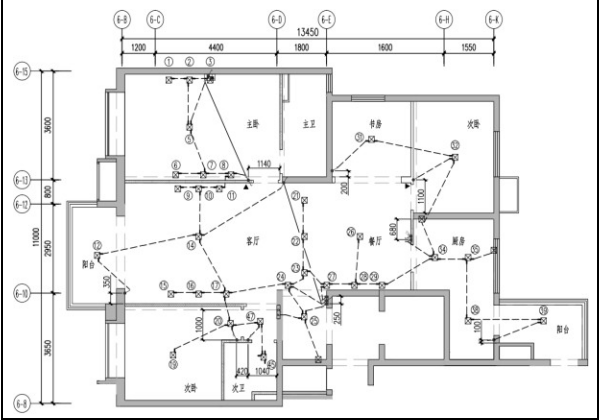
Click to see the larger picture
Deepen the standard
(1) Lighting, sockets and other points should be combined with the decoration map for positioning;
(2) Clear pipeline direction and back box positioning;
(3) Clear bottom box in and out of line, easy to mechanical and electrical factory processing.
Quality control
(1) The site must be pre-buried according to the location of the decorative map;
(2) lighting lines, air-conditioning hang-up sockets go ceiling pre-buried; other sockets, weak electrical pipelines all down the floor of the building pre-buried;
(3) Side-by-side installation of the panel should be straight, the height difference does not exceed 0.5mm,the same height of the same room panel height difference can not exceed 5mm;
(4) Different circuit phase lines by color cross-line distinction . . .L1(yellow)L2(green) L3 (red) .
Forming effect (door sleeve complete, highly consistent)
18
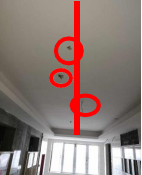
Smallpox lamp position, smoke, spray point deepening
The common area point deepens

Click to see the larger picture
Deepen the standard
(1) Public elevator hall induction switch should be close to the elevator and entrance position, with the door position center aligned, cross-line box, induction switch and lamps and other equipment points should be in a straight line, before the main structure construction should be done to deepen the design, to ensure that all construction in line with the observation requirements;
(2) Wall Face Point Reservations must remain at the same elevation as acceptance conditions permit.
Forming effect (door sleeve complete, highly consistent)
Wrong practices . . . the right practices . .
Line case guidance
Renovation project line is based on civil construction baseline and elevation line, in the construction site of the decoration construction drawings marked content according to the 1:1 ratio of the ground, walls, roofs, accurate and detailed release line, and according to the graphic material to give labels and bullet lines, Is to guide the entire renovation construction process of the control line.
01
The main control line
1, horizontal line: by civil construction to provide the building standard high-level line, is through the floor, space elevation control line.
2, the baseline: the vertical and horizontal baseline led by the civil baseline, for decoration of the space control, is the main control line of the entire construction phase.
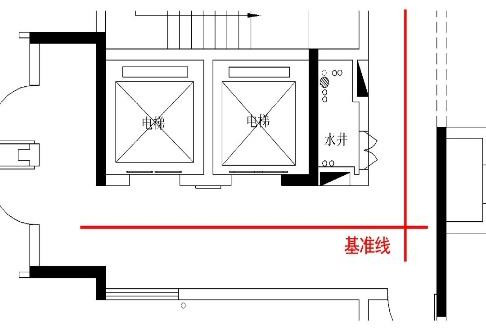
3, decoration surface finish line: wall finish surface (including wall brick layout), ground finish surface line (including floor tile layout), ceiling finish surface line.
Various decorative surface finish lines Example
4, construction positioning line: hydropower end positioning line, water wire pipe positioning line, the main secondary aisle center line, door cover positioning line, cabinet bath cabinet positioning line, toilet positioning line.
Various construction positioning lines Example
02
The specification requirements for the line release and inspection
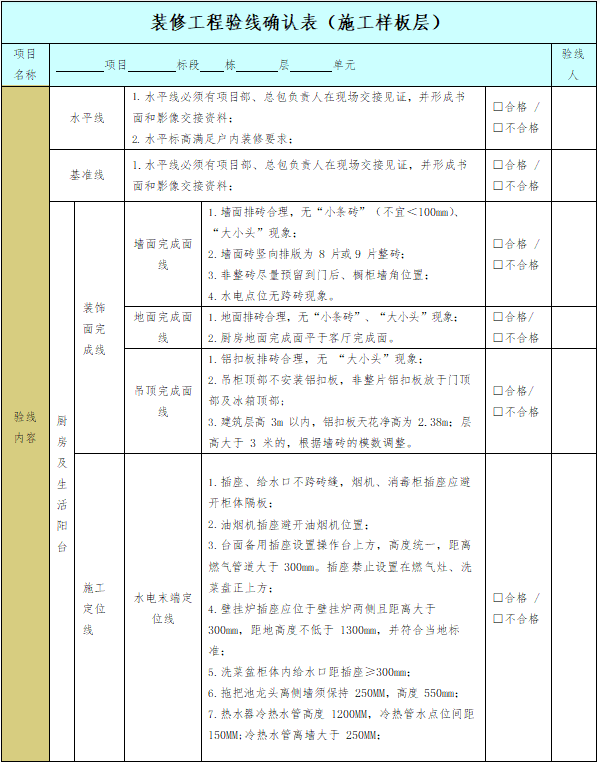
The construction model layer must be confirmed by the horizontal line, the baseline, the decorative finished surface line and the construction positioning line before construction can be completed. Fill in the “Renovation Project Inspection Line Confirmation Form (Construction Model Layer)” and archive;
Processing guidelines in the set
01
Processing area site
- Adjacent to the entrance to the basement driveway, easy access to raw materials;
- Processing, storage area surrounded by elevator settings, easy distribution, smooth transport channels;
- Processing tools are set up next to the catchment well, sewage wastewater after three-stage precipitation pool filter directly into the catchment well, in order to keep the site clean and tidy;
- The whole area is closed to management, idle people and so on are not accessible.
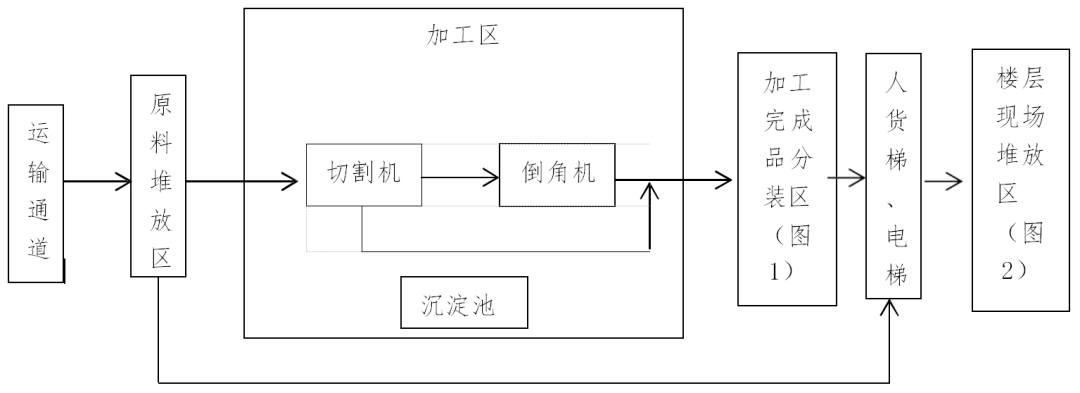
A diagram of the site layout
02
A flowchart of the implementation of centralized processing
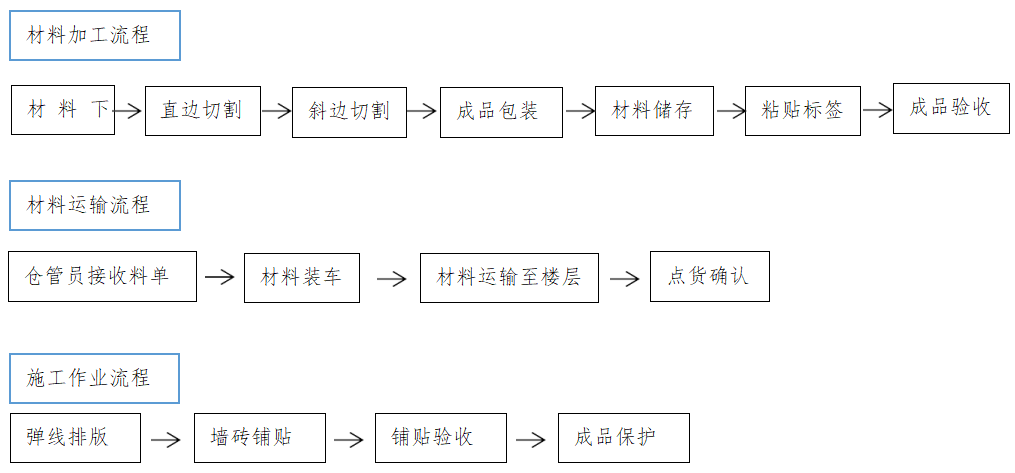
Fine decoration drawings deepen to improve hardcover quality, to achieve perfect delivery for the purpose. In the construction process, the implementation of centralized processing, ruler processing, detailed practices, strengthen the delivery of model layer, site handover and other node control;
Through the refined decoration drawings deepening, for the later materials of centralized processing, dimensional custom processing, providing the necessary conditions, centralized processing to further effectively reduce material losses, reduce construction costs.
