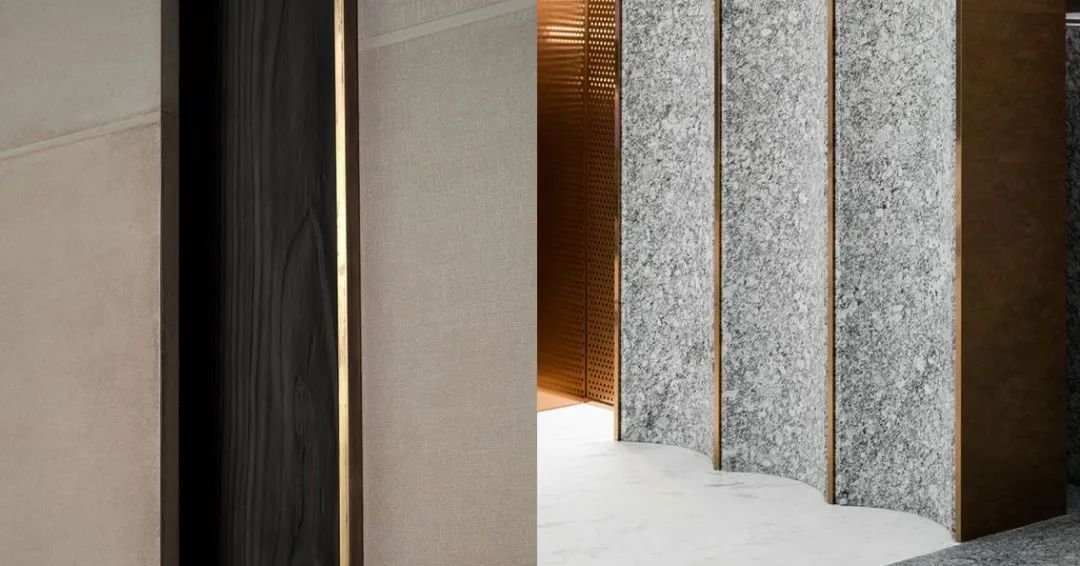
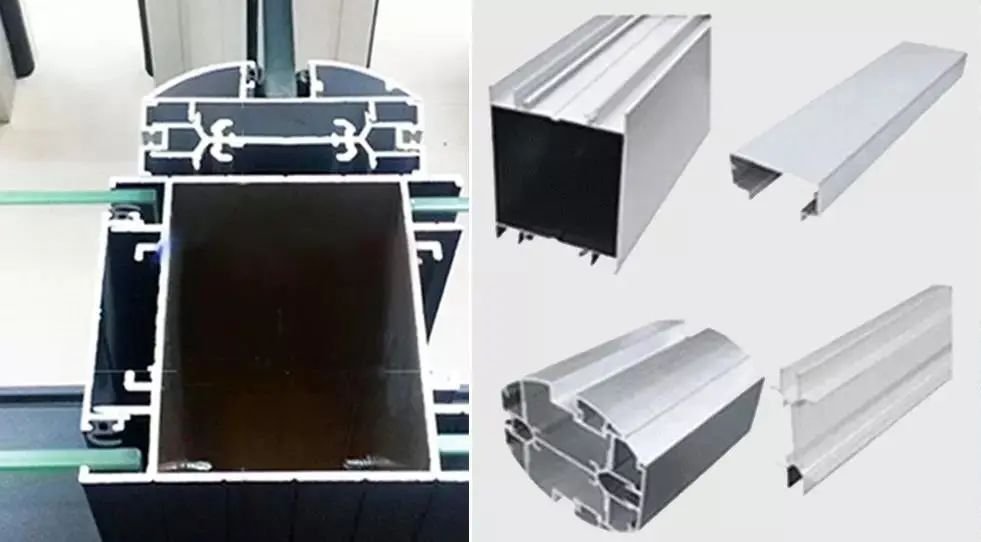
Stainless steel deepening node,6 deeping solutions for edge closing
Decorative projects exist on a variety of needs for deep-processed products, such as stainless steel, aluminum products, glass, and so on, here we need to deepen the processing of products to analyze, find suitable installation nodes, hoping to provide designers with a deeper reference for the construction department to provide installation guidance.
01
Stainless steel door cover installation process and nodes

1.1
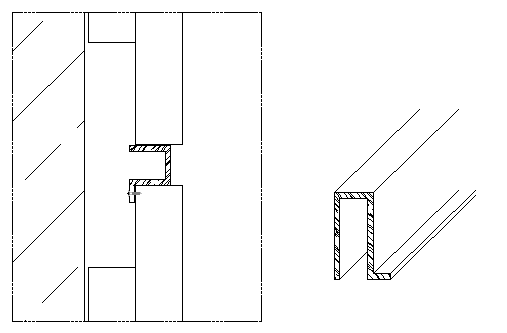
Straight-stitching door cover practice
Fire doors, fire door covers
The general considerations are as follows:
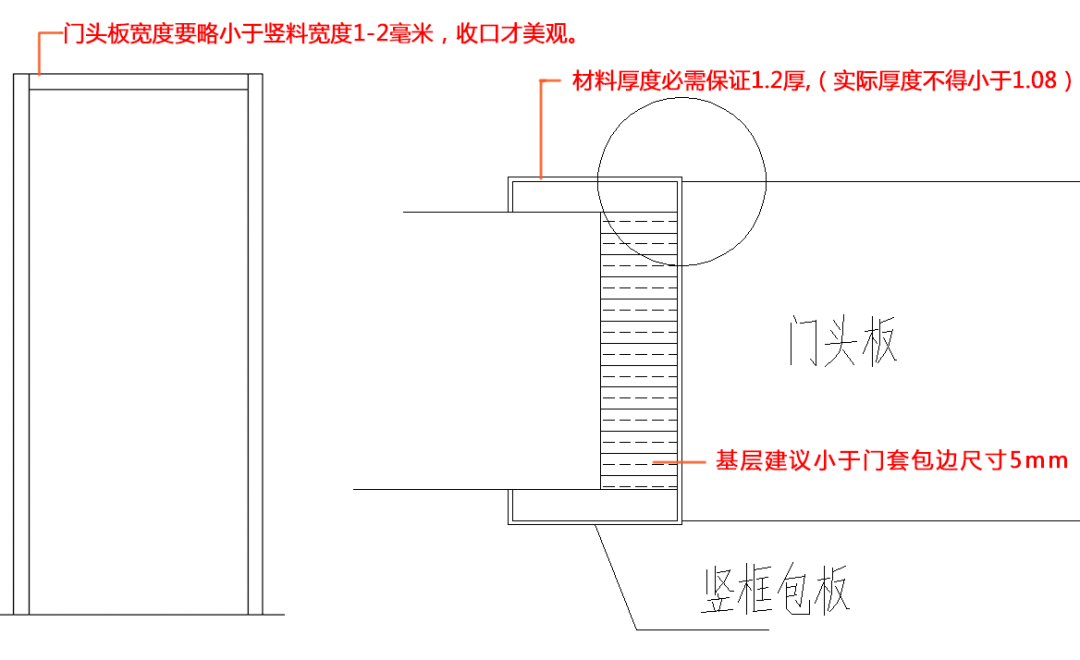
1, the thickness of the material must be guaranteed 1.2 thick (the actual thickness must not be less than 1.08).
2, it is necessary to pay attention to the use of vertical material to close the door head cross material.
3, pay attention to the production of grass-roots that must be smaller than the door cover edge size of about 5mm, to ensure adequate space to install and glue.
4, the width of the door headboard is slightly less than the vertical width of 1-2 mm, the closing is beautiful.
5, the general door headboard and vertical breadboard docking at the yin corner are not recommended to use glue to close so that both are beautiful and can test the quality of the door cover installation.
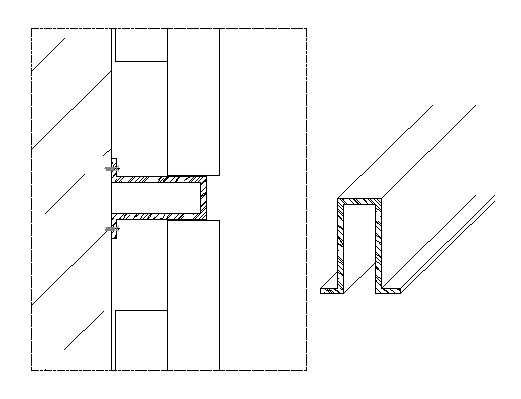
1.2
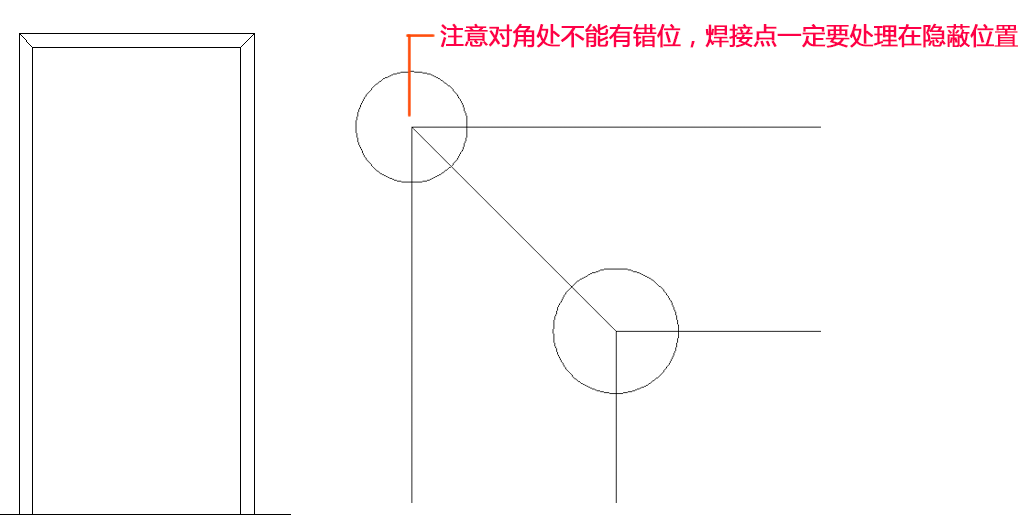
Normal 45-degree stitching door cover practice
Fire doors, fire door covers
The slicing angle is better
Poor installation quality, yin angle glue to cover defects, not recommended to use
The general considerations are as follows:
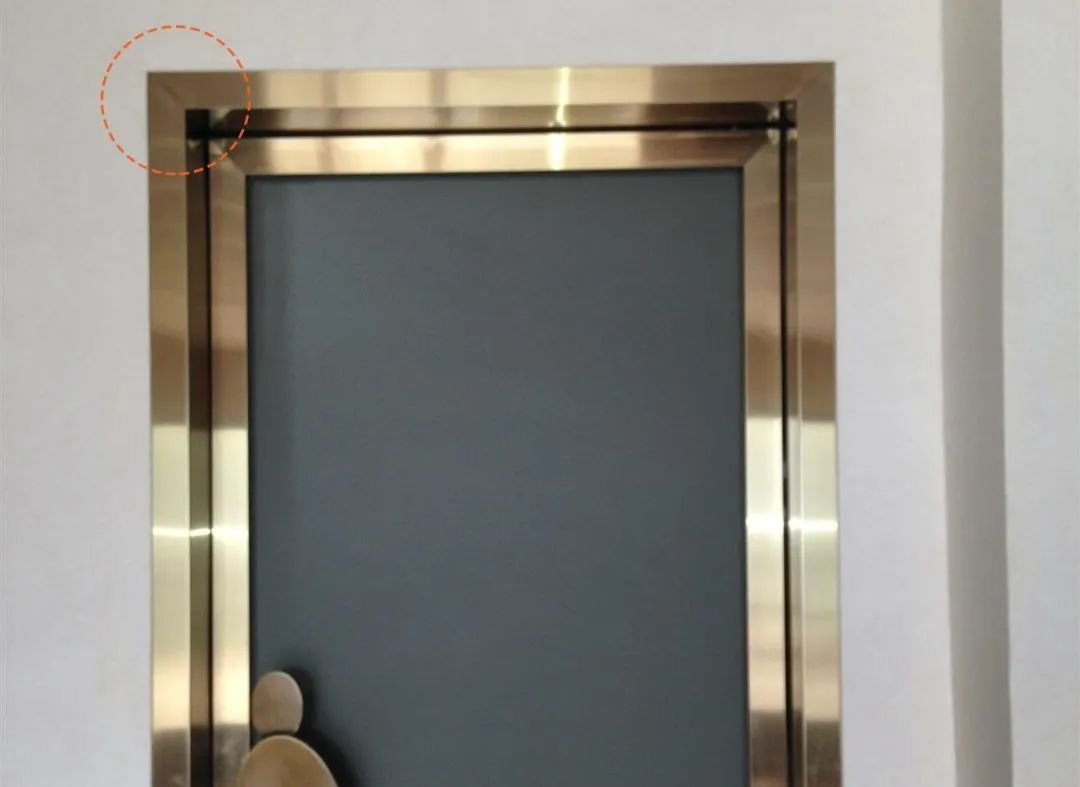
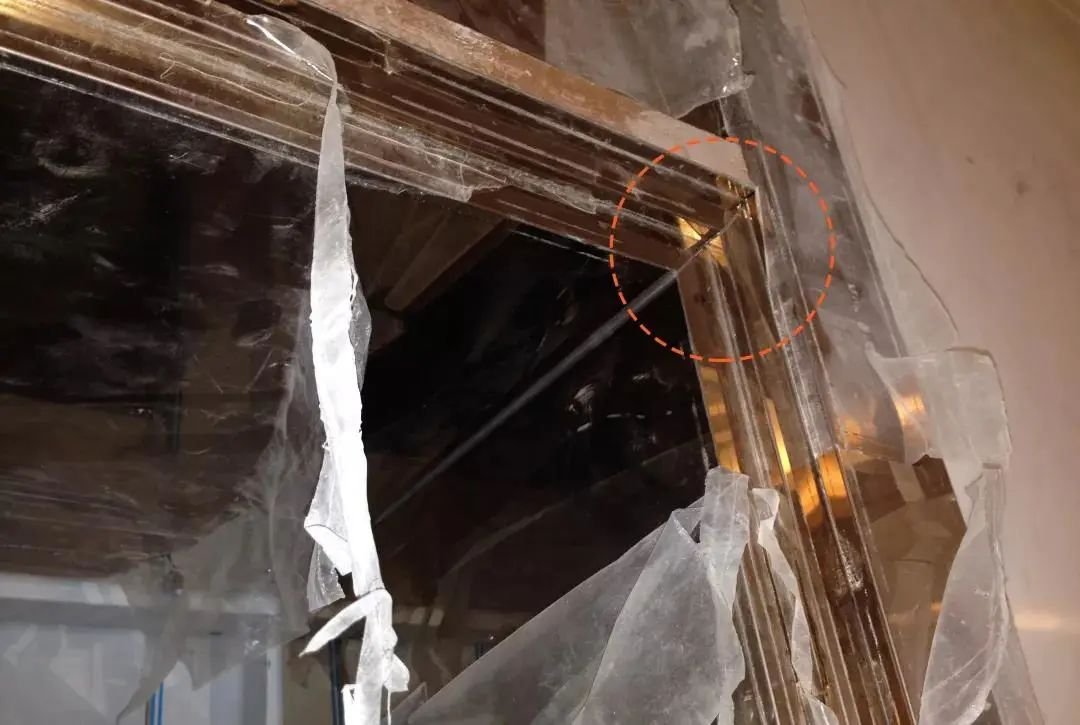
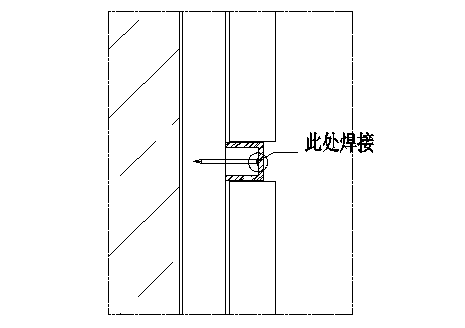
1, material thickness recommended 1.2 thick (actual thickness must not be less than 1.08). Note that there can be no misalignment at the diagonal, and the welding points must be handled in a hidden position.
2, pay attention to the production of grass-roots must be less than the door cover edge size of about 5mm, to ensure adequate space to install and glue.
3, the general door headboard and vertical breadboard docking at the yin corner are not recommended to use glue so that both are beautiful and can test the quality of door cover installation.
1.3
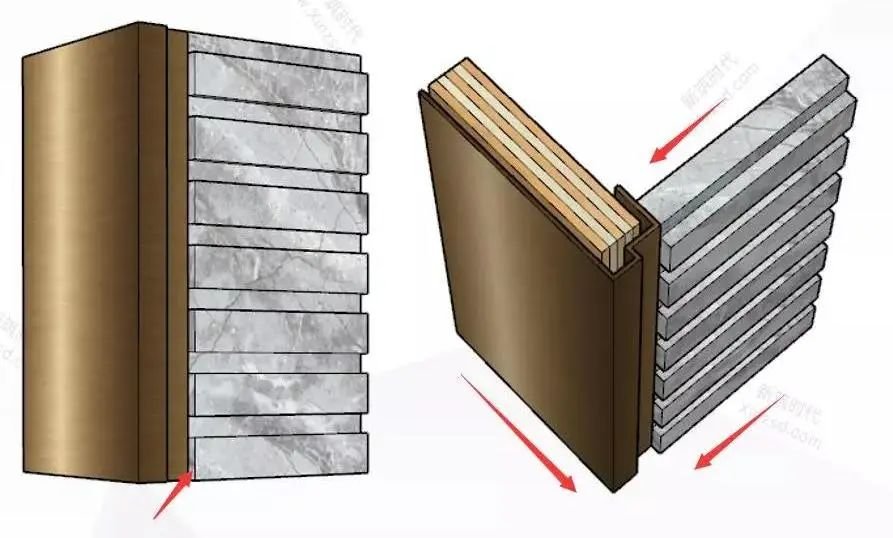
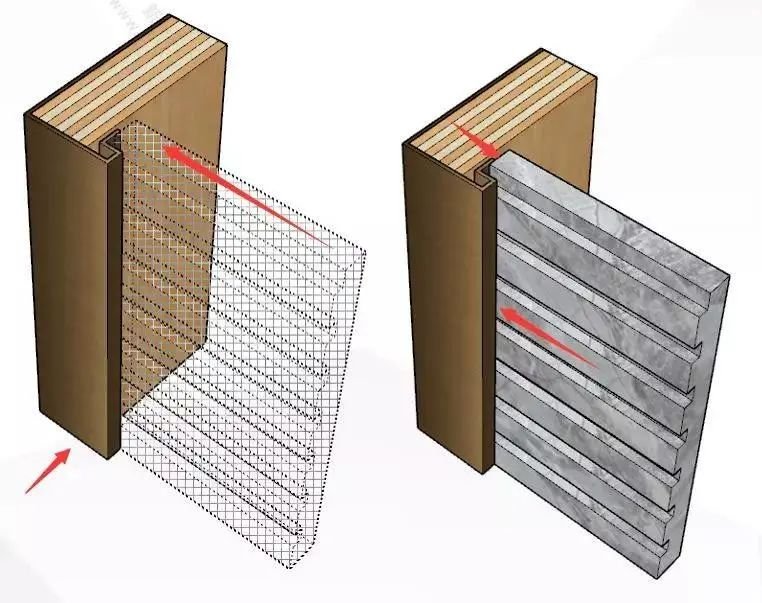
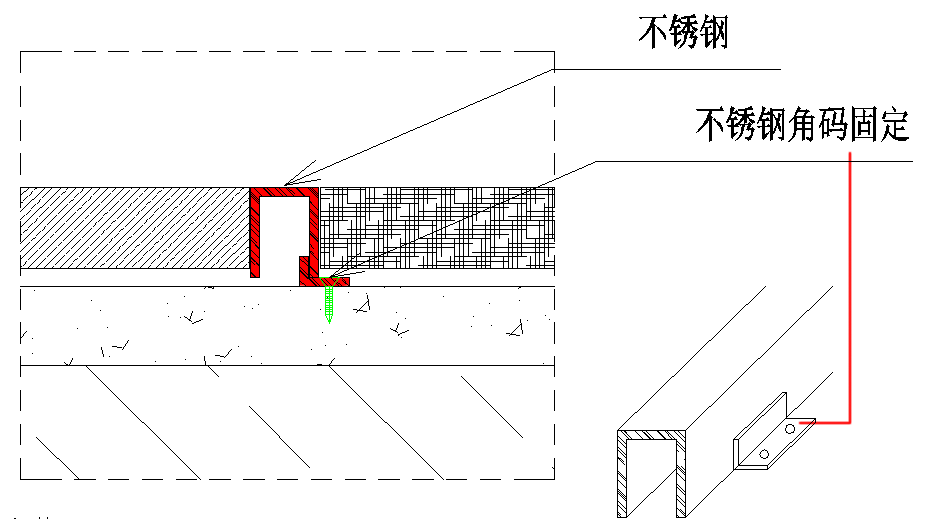
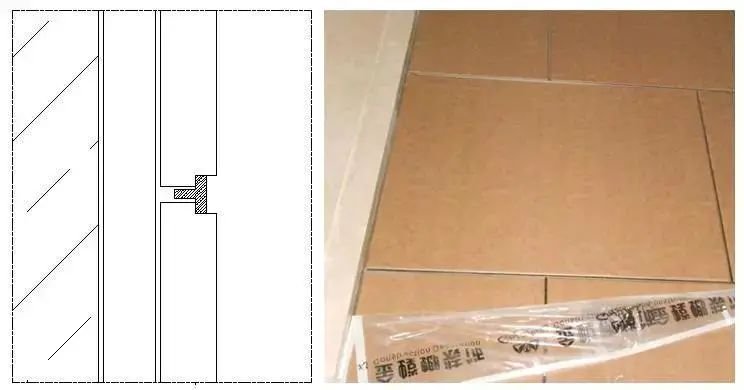
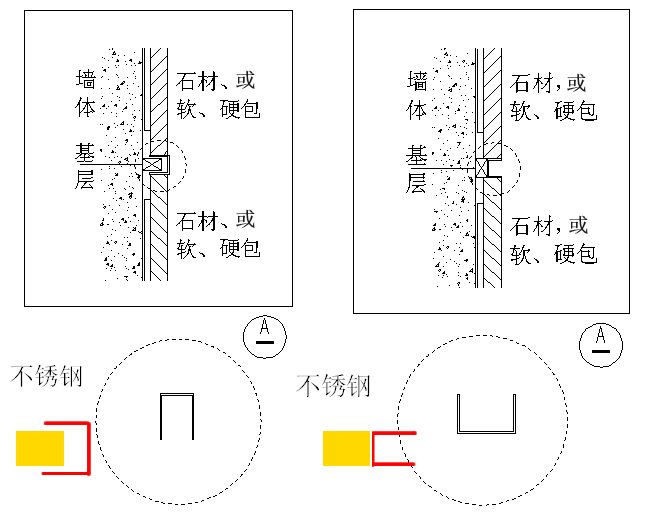
Elevator door covers and stone wall closings
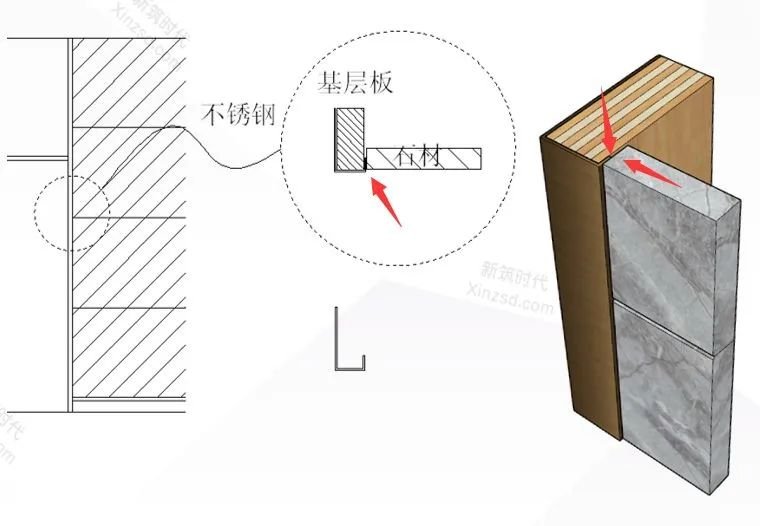
General receiving diagram
The above figure practice has certain disadvantages: stone installation can not guarantee the upper and lower 2 pieces of stone in a straight line, so such a closing may appear stainless steel can not be inserted or stone crevices too big and so on. Damage to the edges of the stone may occur during installation. The drill-down scenario can be referred to in the following figure:
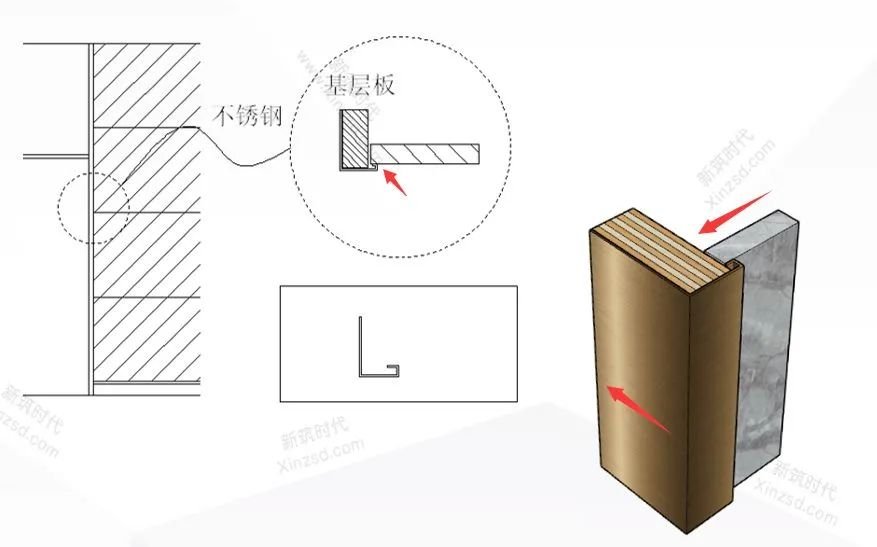
Stainless steel stone can effectively prevent the stone edge installation defects, to achieve clean and beautiful. △
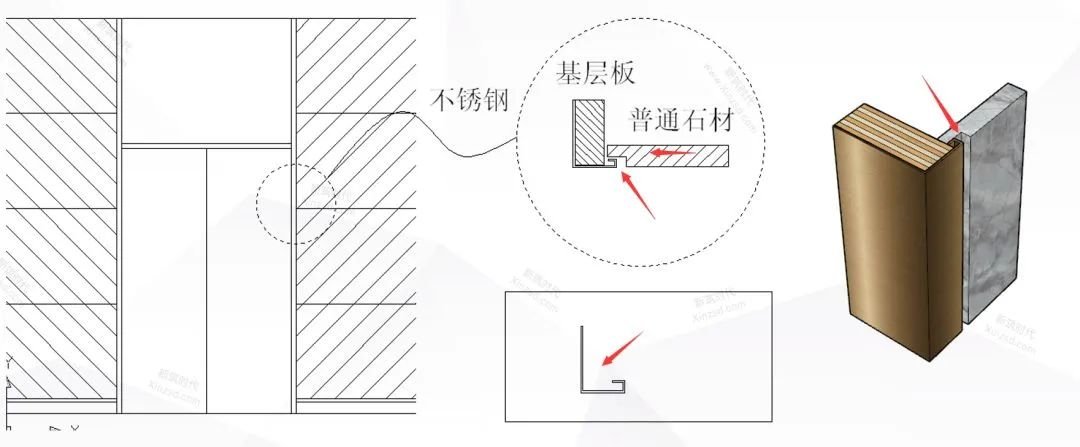
The above nodes to stone manufacturers with slotting treatment, so that leaving a process slot will be more beautiful. Such practices are now more common
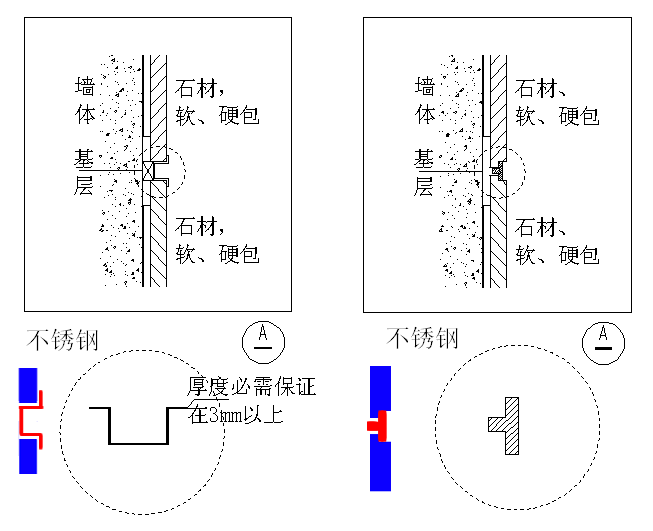
1.4
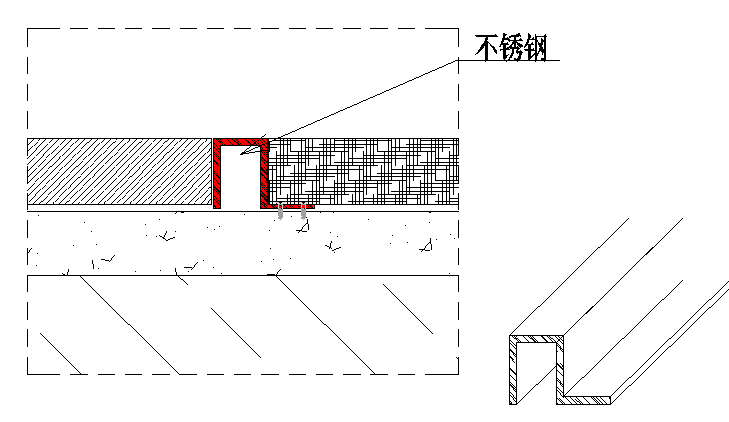
Stainless steel elevator door cover and slot stone outlet node
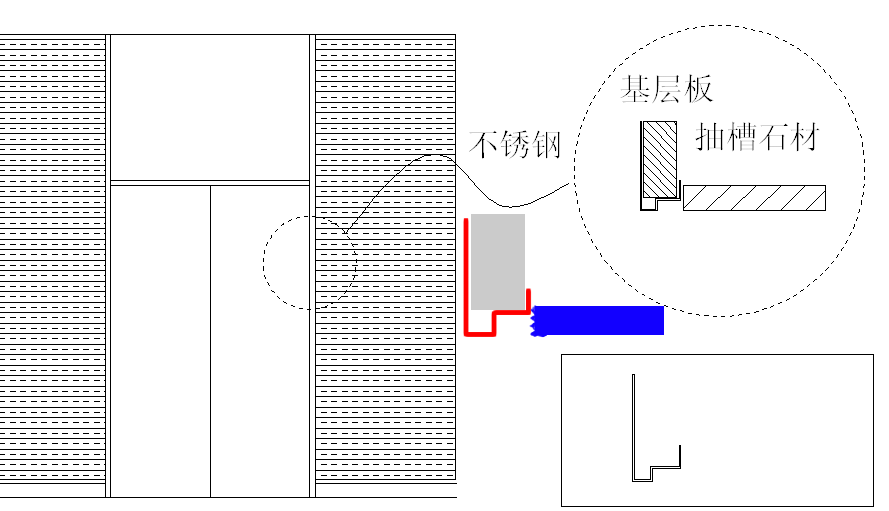
Above, the construction node of conventional groove stone and stainless steel door cover, disadvantages: stone side wool surface needs polishing treatment, in addition, stone edges are prone to damage during installation, and there will be stone edge gaps of varying sizes.

The figure above is a suggested node, stainless steel can not only remove the edge of the stone but also block the side leakage caused by the groove. But increased the production of stainless steel, installation difficulty.
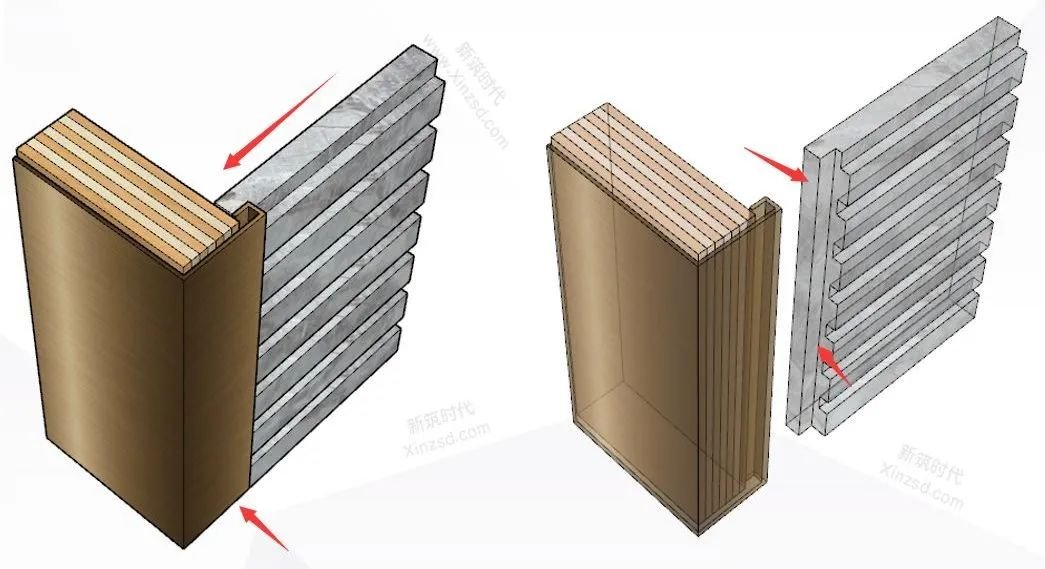
The above diagram requires vertical slotting of the edges of stone manufacturers, which can not only block the side leakage caused by the groove but also reduce the difficulty of stainless steel installation and production.
02
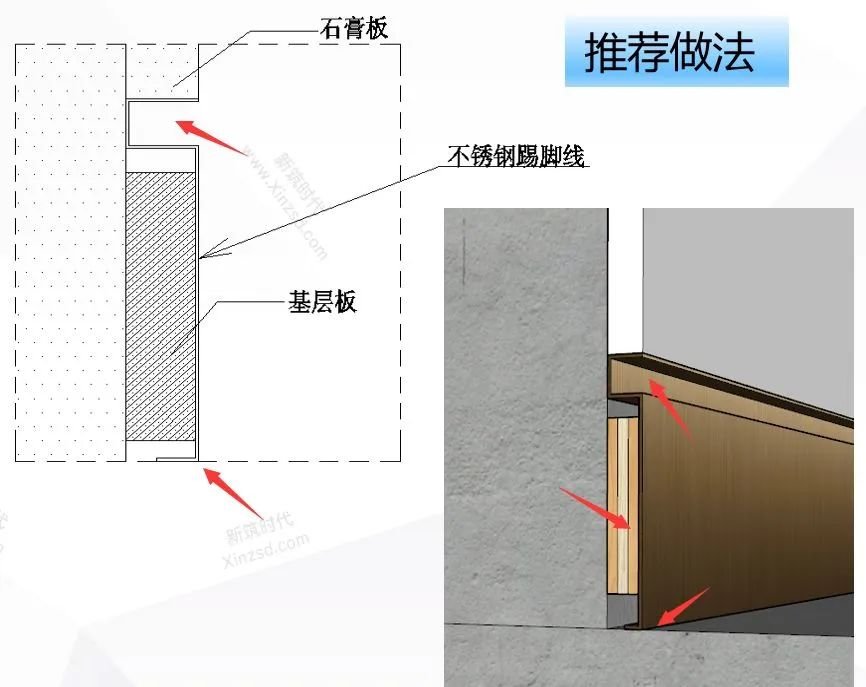
Common stainless steel kickline node analysis

2.1
Regular stainless steel kickline practice
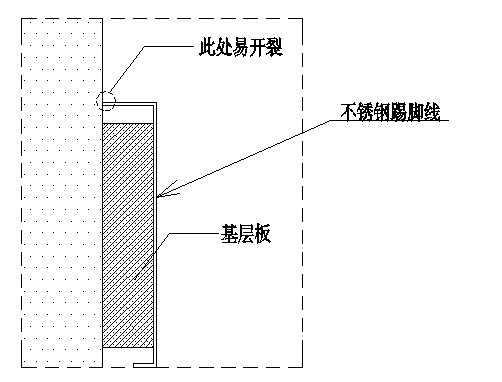
The regular notes are as follows:
1, kickline down must have a turning edge, to ensure that the kick line is not deformed.
2,8cm or more width kick line thickness must ensure 1.2 thick, the actual thickness is not less than 1.08; for easy installation.
The disadvantages of the regular kickline: the junction with the wall is prone to cracking and other phenomena, which is the common disease in the installation of kickline, the wall is uneven case easy to produce gaps.
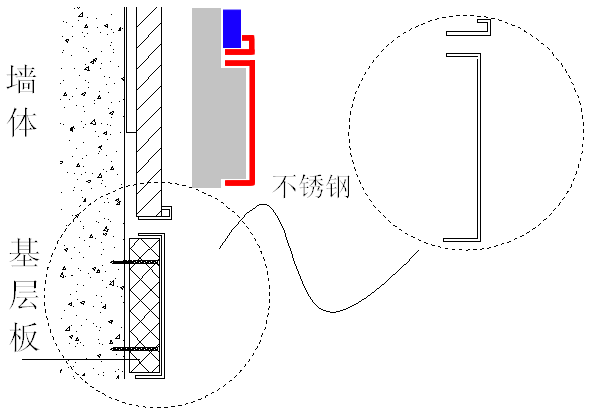
General improvement practices:
1, at present, to avoid the cracking phenomenon here, increased a process seam but also increased the process seam yang angle of the production difficulty.

2, to avoid the disadvantages shown in the figure above, adjust the structure of the kick line so that the painter in the production process when the impotence of the seam can be made with the help of the structure of the kick line, improve efficiency.
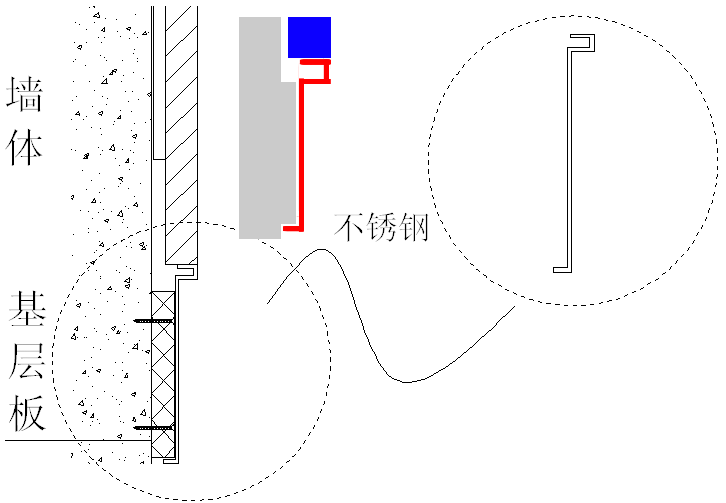
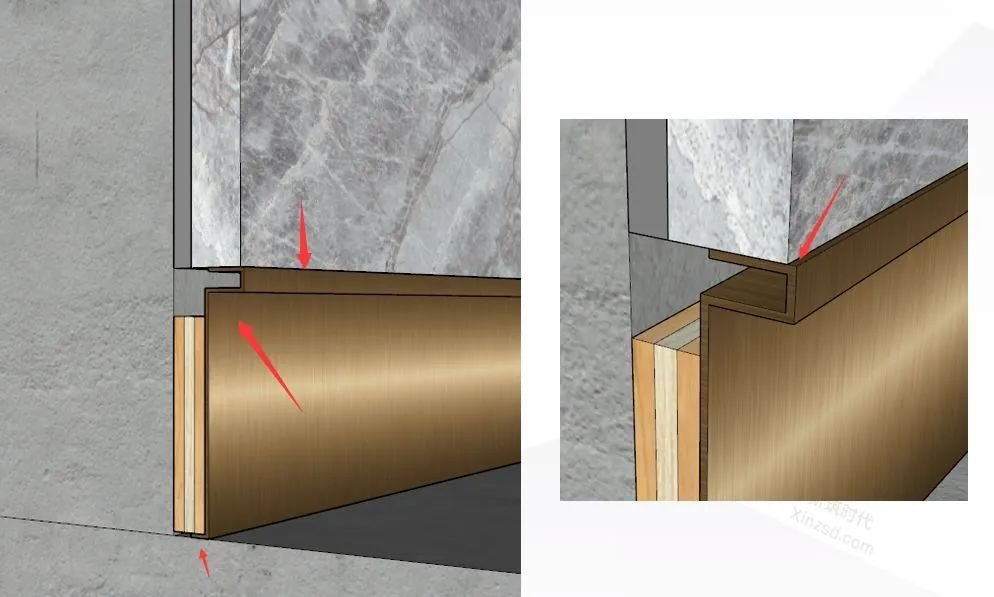
Deeper recommended practices:
1, it is recommended that kick line with traditional methods of production, art seam on the mouth bag a corner bar, which can solve the installation difficulty. If encountering titanium-plated stainless steel kickline, it is recommended to use the method shown in the following image to deepen, effectively avoid the phenomenon of whiteness, but also increase costs.
2, the following image is also a stainless steel kick line deepening program, this approach is more beautiful. The disadvantage is that the installation conditions are higher, it is necessary to ensure sufficient space or kick line card does not go in.
03
The installation process and nodes of stainless steel inserts
3.1
Stainless steel strips between carpets and stone
1, the conventional method is to use stainless steel U-shaped groove to do the pressure seam, as shown below, stainless steel U-slot fixing is still by glue and stone bonding. When installing the side to do a good job of support, such as glue condensation before removing the support rod. Makes installation difficult.

2, the following image in the form of welding code plate to deepen, so that stainless steel and ground installation does not need to do side support. The disadvantage is that the site, especially the rush project, carpet installation may lag, the firmness of the code piece is not enough or will step down the U-type insert, resulting in non-stop repair invisible increase in costs.
3, so it is recommended to use the insert more than folded edge, this side to increase the firmness. Saves money and speeds up installation to ensure overall flatness. (as shown in the following image).
3.2
Wood finish stainless steel strip
1, the following image for our current common practice of wood finish insert: make a U-shaped card strip with glue installed in the wood finish inlay, the disadvantages of this practice are:
When installing wood finishes is local easy to arch or insert itself deformation, prone to pits or large stomach phenomenon, affecting aesthetics. If the wood finish is not consistently sewn, it is difficult to get stuck in, there are installation difficulties, and this practice needs to be installed with glass glue fixed, but also easy to contaminate the wall.
2, the following practice is to avoid all kinds of disadvantages, and easy to install, with sink screws instead of glue, but the installation order, must first install stainless steel, after the installation of wood finish.
3, the following approach is more beautiful, with no drawbacks. But to cooperate with wood finish manufacturers, the processing of good strips to wood finish manufacturers, by wood finish manufacturers to install. The project department needs to coordinate well.
4, this practice is in the stainless steel U-slot back welding nails, to the scene directly nailed to the base plate. This practice is suitable for rush hours, but the wood-stone crevice size standard must be guaranteed. However, it is not suitable for the surface titanium-plated insert, the surface will be imprinted when welded on the back.
5, the following stainless steel profile practice is currently relatively mature. Stainless steel size is required not to be too large, normal within 10mm. Surface treatment is difficult, especially with titanium on the mirror.
3.3
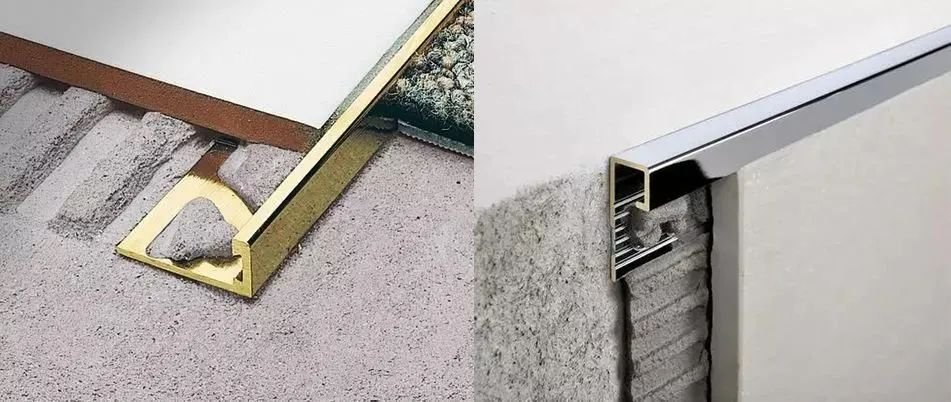
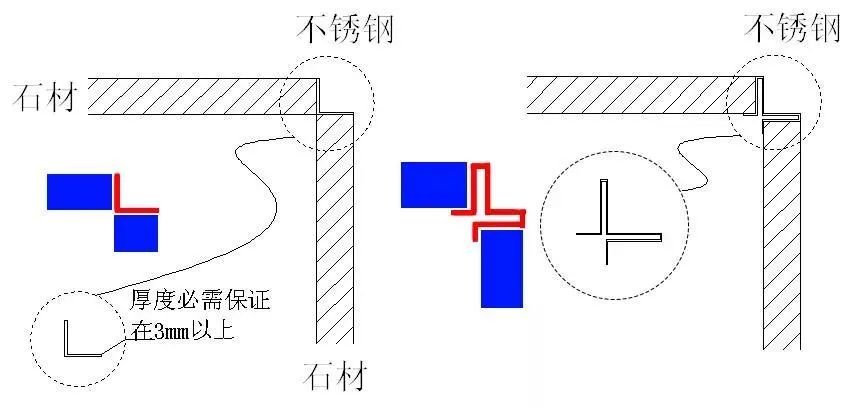
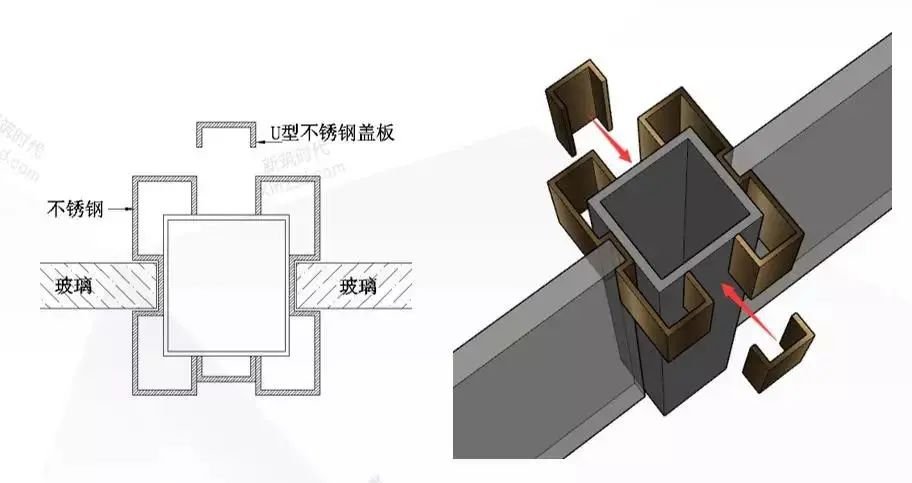
Stainless steel strip with stone interface
1, conventional hard and soft bags and stone inserts as shown in the figure above, the pressure strip is a U-shaped card slot positive and negative buckle, forming a beautiful craft seam. The size requirements of stone crevices are relatively high, and it is easy to damage the corners of stone when installed.
2, stainless steel thickness guarantee more than 3mm, because the folding edge is a decorative surface, visible edge practice.
This practice requires the treatment of stainless steel edges, such as titanium plating does not require the use of finished titanium-plated but can consider using aluminum profiles as inserts, shape variable size limits are less
3.4
Stone Yangjiao strip stainless steel practice
1, below is the stone yang angle strip stainless steel general practice diagram
As is common practice for us, stainless steel thickness must be guaranteed 3mm to on, because the edge is visible at the edge. This practice requires treatment of stainless steel edges, and titanium plating does not require the use of finished titanium plating and titanium plate processing. Increased production costs. At the same time, the installation of the use of glue, easy to fall off.
It is recommended to use the deepening node shown in the figure on the right, which is cut and folded from the plate, which reduces the cost, especially the titanium-plated yang angle that can be made directly from the titanium plate while reducing the processing of the side. With the side of the card stainless steel is not easy to fall off.
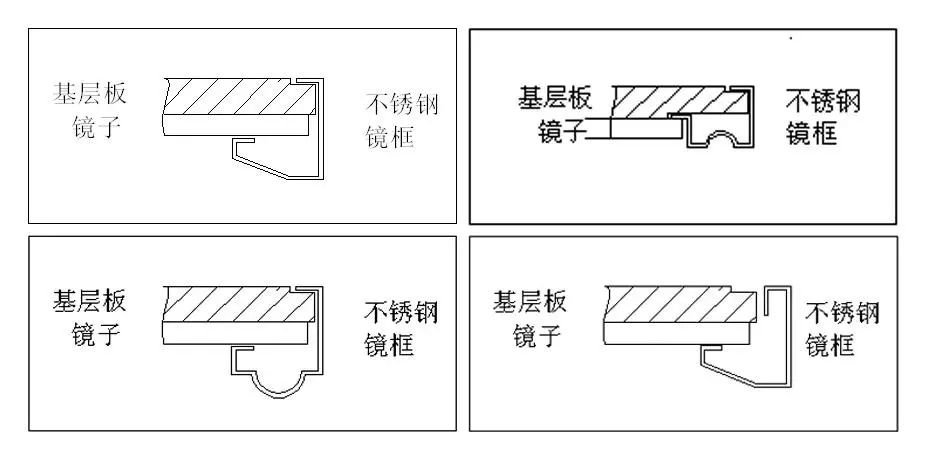
04
Stainless steel frame line node
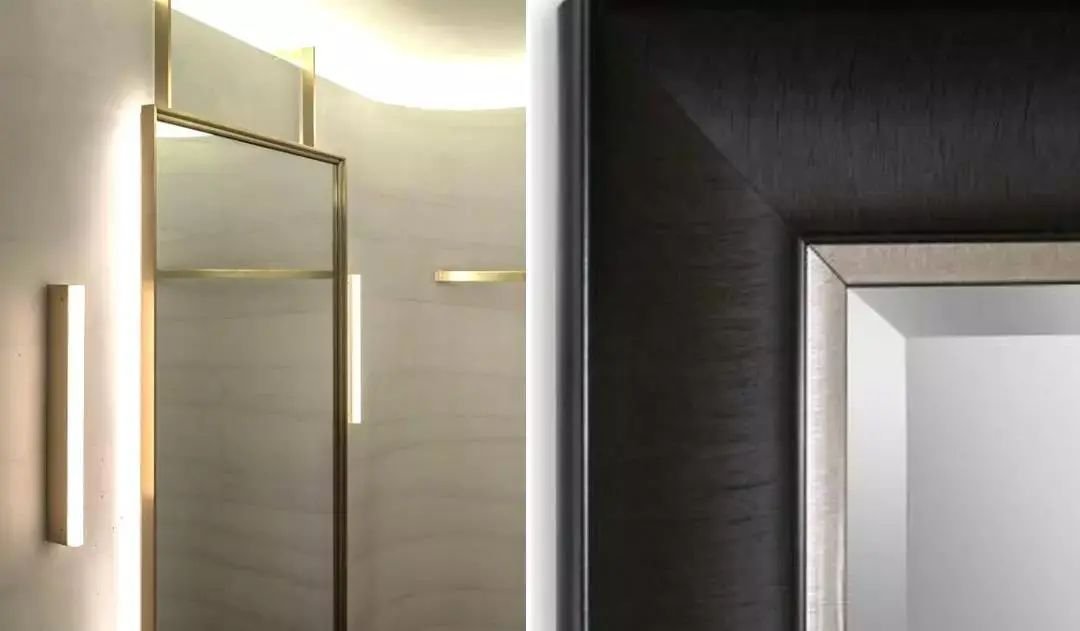
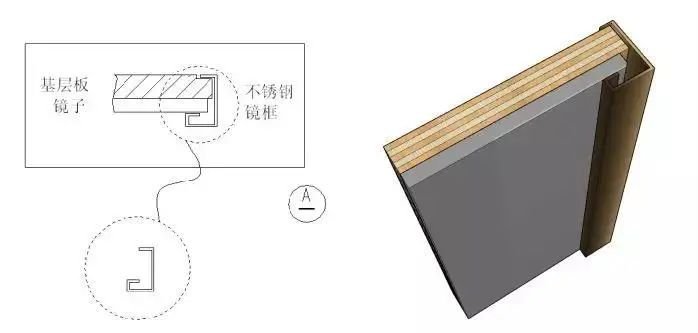
1, our usual stainless steel frame line practice is to install the mirror first and then in the field to install a stainless steel line.
The disadvantages of this approach: the mirror is not easy to replace when damaged later; Stainless steel on-site production size requirements are high, welding if space is not enough easy to cause damage to the finished surface, late replacement is more troublesome.

2, this is to install stainless steel frame wire and then install the mirror, the mirror is the finished card into the frame line. Therefore, the size of the mirror is more accurate, the surrounding gap to be reserved about 1-2mm, easy to install, later mirror damage when the removal is easier.
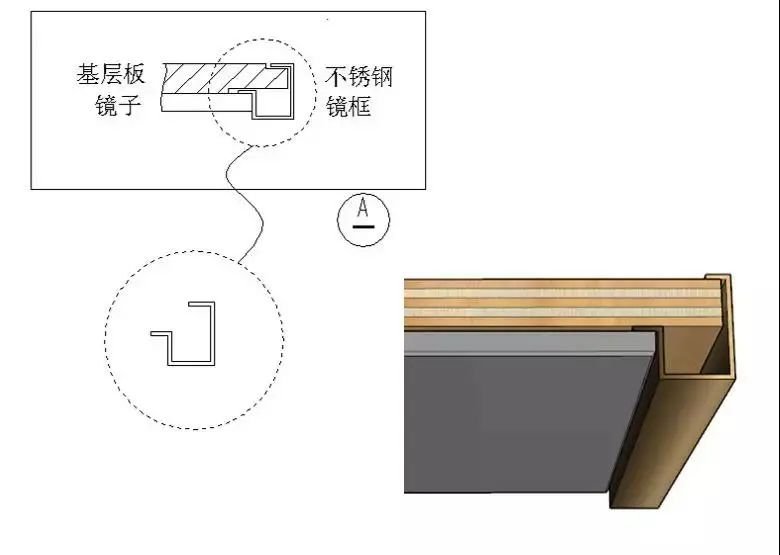
3, the finished frame line practice, is also our recommended practice, stainless steel frame line can be done in the factory finished product to the scene set up. Stainless steel detail handling is better than on-site handling and can achieve relative aesthetics. Late dismantling is also more convenient.
05
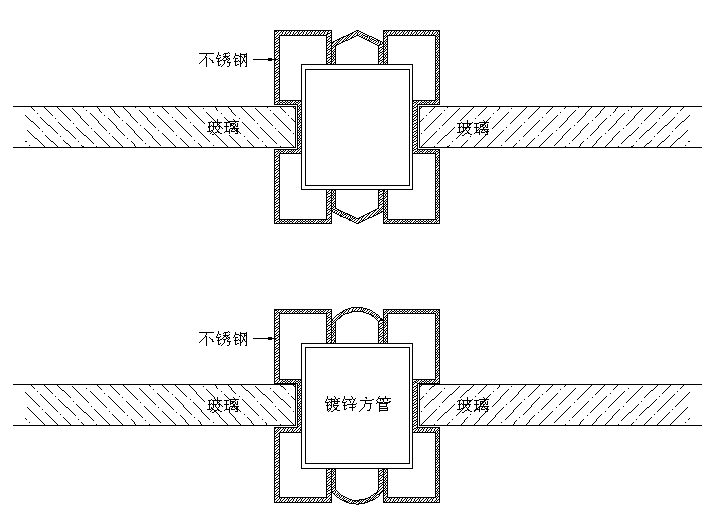
Stainless steel railing nodes deepen
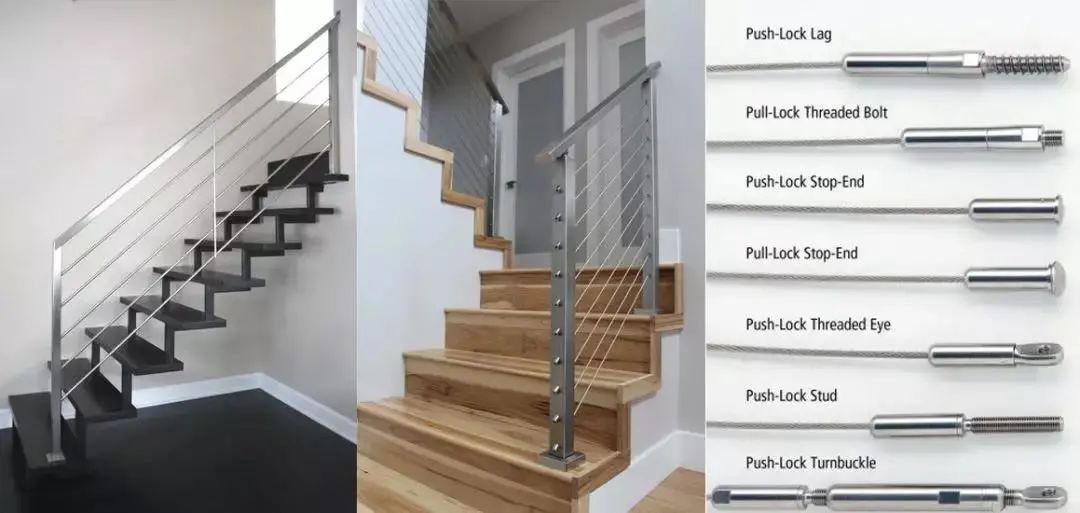
5.1
Single column through tube stainless steel stair railings
1, the column is two pieces of 2.0 thick square pipe under the mouth clip stainless steel pre-buried parts, upper port clamp armrest connection. Pre-buried pieces are laid before the stone has been pre-buried, the stone is to open the hole after the assembly up, flange covers the gap left by the stone opening.
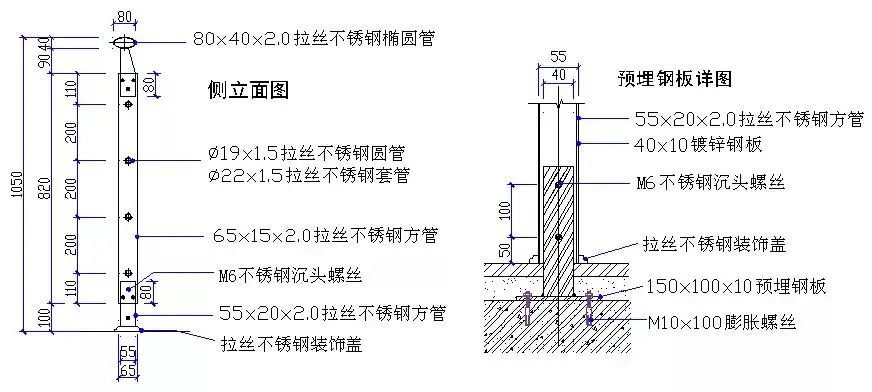
The main feature of this method of railings is that the pre-buried parts are installed before the stepping plate is laid, and the location of the pre-buried parts is very accurate.
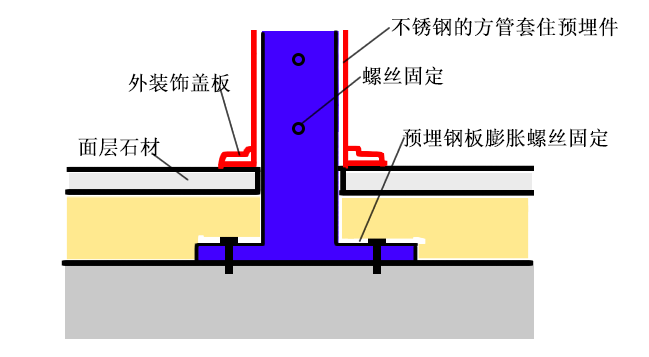
2, another installation method, the main difference is to install the stone step after the installation of metal pre-buried on the stone. Fix the metal pre-buried (preferably stainless steel pre-buried plate) with an expansion tube, and the later columns are welded to the stainless steel pre-buried plate, covering up the welding defects with a decorative cover.
Precautions for installation:
1, taking into account the force, this installation scheme is suitable for stone-paved stair steps, others such as tiles are not recommended to use this installation method.
2, after laying must ensure 3-4 days to work on the stone, to ensure that the laying of the grass-roots mortar condensation solid.
3, the conditions allow the best in the expansion tube when pre-buried plate coated with glue, increase the firmness.
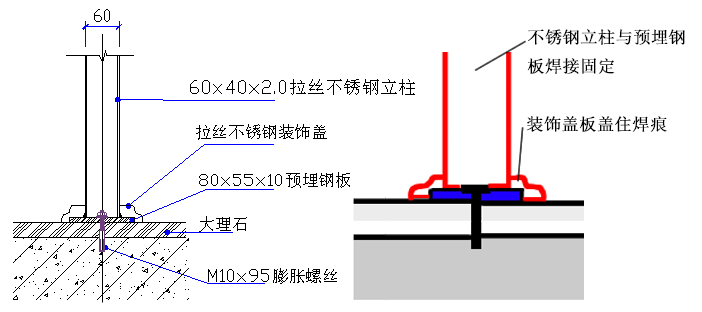
5.2
The node practice of stainless steel handrails
1, left image for the whitewashed wall in front of the installation of pre-buried, handrails and pre-buried welding after painting the wall to cover off the welding left behind defects;
2, the right picture is the wall flour brush after planting pre-buried parts on the finished surface, and then welding handrails and pre-buried, and finally covering the installation defects with flange cover.
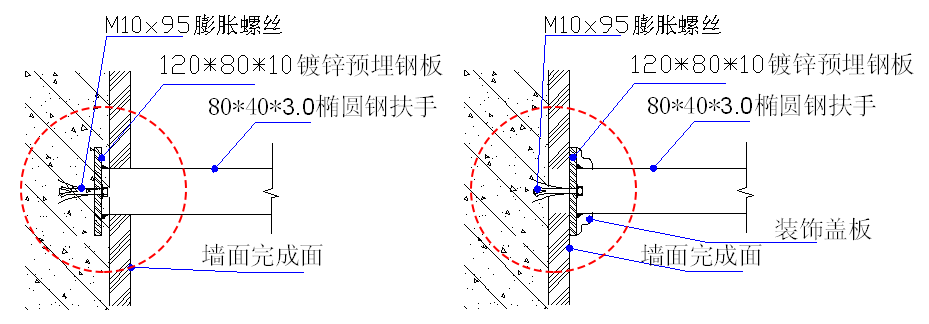
A diagram of the connection of the armrest to the wall
06
Stainless steel break-out plate node
1, the general practice is the plate folded into two grooved plates, and then welded to the steel pipe base. If the quality requirements are very high, it is necessary to ensure that the finished titanium plating, the finished titanium-plated has a common disease is the groove inner corner is difficult to plate to the desired effect.
2, the structure of the improved partition plate, the use of U-plate to cover stainless steel plate, and the welding defects at the base. The U-plate reservation size is required to be accurate, otherwise, the U-shaped card slot will be deformed or flash-stitched.
3, the recommended practice in the original U-shaped pressure bar is based on the shape adjustment, so that the pressure bar in the process of the seam in time for deformation is also the shape of the slot itself to cover off.