
Project planning on the overall project management ideas, risk control, key points, difficult points of the mapping, complete the project progress, quality, safety, cost management objectives, improve the economic and social benefits of enterprises. However, in most construction enterprises, project planning has not been paid enough attention to and effective implementation, which will inevitably lead to the project objectives in the construction process constantly changing resulting in investment, over-construction, and other phenomena.
The following from the analysis of the case, from the project construction organization, deepening design, project management planning, and other aspects to explain the importance of pre-project planning.
01
Construction organization planning is a strong guarantee for the project to achieve high quality, high speed, low cost, and low consumption
1.1 Construction process arrangements
1.2 Construction line arrangements
(1) Set up a dedicated channel for employees to work on and off the field according to the situation on-site
(2) Set up special passageways for the transportation of workers and materials
1.3 Milestone Event Node
1.4 Construction progress control system
(1) According to the project duration requirements, combined with the actual situation of the project to develop a reasonable and effective schedule.
(2) Around the owner planning module, find out the key nodes to develop the construction network map, and around the network map key node decomposition to develop the professional, construction unit area, short-term plan.
This is a tentative plan, after entering the site according to the actual situation of the re-enactment of the plan
1.5 Workforce Plan
1.6 Progress safeguards
1.7 Coordination and coordination of safeguard measures
1.8 Material process management
(1) Prepare a material procurement plan to identify those responsible;
(2) grasp the seal sample progress, hold the seal sample node;
(3) Internal coordination to speed up the procurement process;
(4) external processing materials, the whole processing period, progress, and quality tracking;
(5) strict control materials into the market, to eliminate non-conforming materials into the;
(6) Reasonable arrangement of storage sites, reduce the number of in-field reverse shipments, reduce material waste;
(7) Before the use of materials, do a good job of bottoming, to avoid misuse resulting in secondary procurement (processing), affecting the overall duration.
1.9 Material seal tracking table
02
Put the control project in advance
2.1 Lobby LED background wall scheme optimized
The design must be landable and easy to maintain in the future, ensuring safety. Modular installation is required for easy integrated removal.
The process simulation diagram
(1) Line positioning, fixed steel skeleton
(2) Install the LDE screen module
(3) After the LED screen debugging is completed, install the surface clamp steel a glass
(4) After the installation is complete, clean up and carry out the final comprehensive commissioning
Lobby line positioning, wall steel skeleton following the LED module size construction
LED background wall disassembly schematic
LED lightbox installation node
2.2 Special scheme for the laying of surface rock slabs
Due to the nature of the project itself, the ground floor of the lobby area on the first floor is large slabs (10mm thick). In the construction process, if the material selection or construction process control is not proper, easy to crack, arch, empty drum, shedding, and other quality diseases.
Ground slab construction process:
(1) The grass-roots level should be solid, solid, no empty drum, sand, tensile strength should not be less than 0.4MPa;
(2) Use of empty drum hammer and other special tools for basic empty drum detection, empty drum parts should be cleaned, brushing interface agent treatment, with flat mortar repair flat.
(3) The use of a horizontal ruler, rely on the foot for grass-roots flatness detection, grass-roots surface flatness deviation per 2 meters should not be greater than 3mm.
(4) When the grass-roots flatness does not meet the requirements, the use of flat mortar (should be self-leveling mortar) for grass-roots leveling treatment.
(5) Self-leveling mortar construction should reach the design thickness, if the self-level design thickness ≤ 4mm, the use of self-leveling special scraper for scraping, auxiliary leveling; Depth to structural layer; clean with a vacuum cleaner after cutting, fill the seam with an elastic sealant with a glue gun, and scrape flat with a flat shovel.
(6) Since the completion of the level mortar construction should be maintained not less than 24h, and do a good job of finished product protection.
(7) Place the sheet to be laid against the large plate scraper hanger with the bonding face outwards.
(8) The grass and sheet bonding surfaces are kept clean, dust-free, and free of water.
(9) Double-sided scraping paste: on the surface of the base layer evenly batch scraping adhesive, the thickness of 3 to 5mm;
(10) Use a serrated spatula to comb out the uniform, full, clear continuous stripes in a direction parallel to each other.
(11) The jagged spatula is bonded to the wall floor and sheet into a 45-60-degree angle.
(12) Control the thickness of the bonding layer is 5mm to 8mm, and the amount of adhesive is 8 to 12 kg/m2.
(13) Press from the middle of the sheet to the surrounding side using a vibratory tiler, pressing in a direction parallel to the stripes of the binder, to ensure that the air between the sheet and the base layer is fully drained, so that the adhesive layer full pulp rate of 100%.
(14) Clean up the excess binder squeezed out of the gap.
(15) Use a leveler at the seam to adjust the flatness of the adjacent two sheets;
(16) The overall use of leveling, with the horizontal ruler, the adjustment surface flatness error should not be greater than 2mm.
(17) Large area of the spreadsheet should be set through the telescopic seam, telescopic seam spacing of 6 to 8m, the width of 5 to 10mm.
(18) The telescopic seam should be disconnected from the flat layer and extended to the surface of the sheet, filled with sealant or flexible decorative lines.
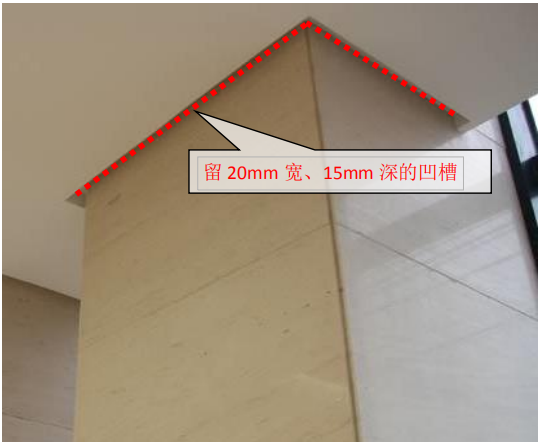
2.3 Gypsum board ceiling
Large area gypsum board ceiling in the material selection or construction process control is not appropriate, prone to cracking, arching and other quality diseases.
Gypsum board ceiling construction process:
(1) The ceiling’s unilateral distance of more than 12 meters should be set telescopic seams.
(2) Double-layer gypsum board ceiling needs to be left 10-20mm seam, handover length of 30-50mm, retractable seam edge to sling spacing is not greater than 300mm.
(3) The main keel shall be arched, the height of which is 1/200 other short-sided span of the room.
Notes on key operations of the ceiling:
(1) Material: ceiling master, sub-keel specifications, models, plates are in line with the design requirements: C60 series keel.
(2) Keel spacing: following the specifications and industry practice requirements, the boom should be straight, when the length of the boom is greater than 1.5m, should be set up anti-support
(3) Covert project acceptance: panel installation must be carried out before the covert project acceptance, keel solid, architectural spacing, fire prevention, ceiling pipe, equipment, etc. for acceptance.
(4) Corner seal requirements: corner bit of the plate must be made L-type, to avoid cracking.
(5) Plate seam treatment: the trim panel seams need to be anti-cracking treatment, the plate seam straight, wide, and narrow consistent, the gap between the two plates is uniform 4-7mm.
(6) Lamp installation: Heavy-duty lamps, electric fans, and other heavy equipment are strictly prohibited from being installed on the keel of the ceiling project.
2.4 Steel staircase
Deepen the design cooperation, auxiliary design plan landing!
2.5 Match the site progress with the drawing progress
Due to the relatively short construction period, in the current drawings have not been perfected, the project fully cooperates with the design to complete the corresponding deepening drawing supplement work, specifically with the process as follows:
Design according to the drawing progress stage to provide construction programs, by the project department to deepen the design to cooperate with the designer to improve the construction drawings submitted to the design confirmation, to be confirmed after the design of the project department arrangements for construction and material procurement, through the above measures to shorten the construction drawings as short as possible, for the site construction time, to ensure that the schedule is completed on schedule.
03
The project construction process interacts with the deepening design workflow
3.1 Deepen / Optimize design content
(1) Top face:
According to the field loft size, deepen the top surface elevation, keel base nodes, curtain boxes, air conditioning air vents, make a large sample to optimize the grass-roots practice;
(2) Walls:
Deepen the wall modeling base production node, decorative material adjacent interface,
LED screen glass base and installation method,
Wall slab layout and installation methods;
(3) Ground:
Deepen the ground stone layout and interface with the metal.
Item Deepens the Design Of the Organizational Structure Diagram
3.2 Line control points
(1) According to the civil construction benchmark elevation line, eject the elevation line, and the corresponding ceiling elevation line, and electromechanical completion surface line, as well as the position line of the partition wall beam.
(2) According to the construction drawing and the set of reference points, respectively, the wood finish, marble, and another finished surface.
(3) To make it more intuitive for everyone who has not seen the drawings to understand the interior decoration, the finished furniture, ceiling shape, top lamp insinuation position should be ejected on the wall and the ground respectively.
(4) According to the comprehensive ceiling drawings, the fan, manhole, and air vent are ejected from the top surface respectively.
(5) At the same time, according to the line rules, marked the level, corner logo.
(6) Identify the materials used on the wall and the ground according to the drawings.
(7) All top elevations, lamp hole positions, air vents are reflected on the ground, and wall finish surfaces are reflected on the ground.
(8) The finished surface is reflected on the wall, and the material dividing line on the wall is reflected.
3.3 Deepen case sharing
Elevator door cover drawings Deepening
Hanging top closing drawings deepen
The cylinder air vent drawing deepens
Near the curtain wall, the smallpox air vent drawing deepens
Wall wood finish drawings deepen
Wall slab drawings deepen
Wall TV wallpaper drawings deepen
04
Timely put forward drawings and on-site problems, and improve
(1) Lobby high smallpox and low smallpox difference of 1.8 meters according to specifications to do steel frame conversion layer, please confirm.
(2) Curtain box and curtain wall too close, hanging plate size is too large to install, it is recommended to increase the width of the curtain box size.
Ceiling lamp slot (I-A-610.1 15), ceiling 80mm stone size is too small may exist installation and safety issues recommended to change to gypsum board.
Elevator door four weeks did not see the floor display or arrival lights, whether to increase.
05
Material management
Centralized processing, centralized management, reduce costs, reduce waste, improve efficiency, regulate safety.
Material entry plan tracking table
5.1 Quality control inspection of external processing units
(1) The project department organizes manufacturers, teams, and managers to study drawings and finally determine the layout processing plan.
(2) According to the size of the rock slab to refine the layout module, submitted to the design, the owner to confirm.
(3) Deepen the approval of the signature of the next order drawings and submit them to the factory for custom processing, the implementation of processing completion time, and processing quality standards
06
Finished product protection and completion delivery
Delivery and after-sales service
Finished product protection principle: who construction who protects the whole process of construction finished product protection, for the construction channel and other key parts to take strengthening protection measures to prevent man-made damage.
